 Toyota Camry XV30 (2002–2006) Service ManualWindshield/windowglass/mirror
Back window glass
Back window glass
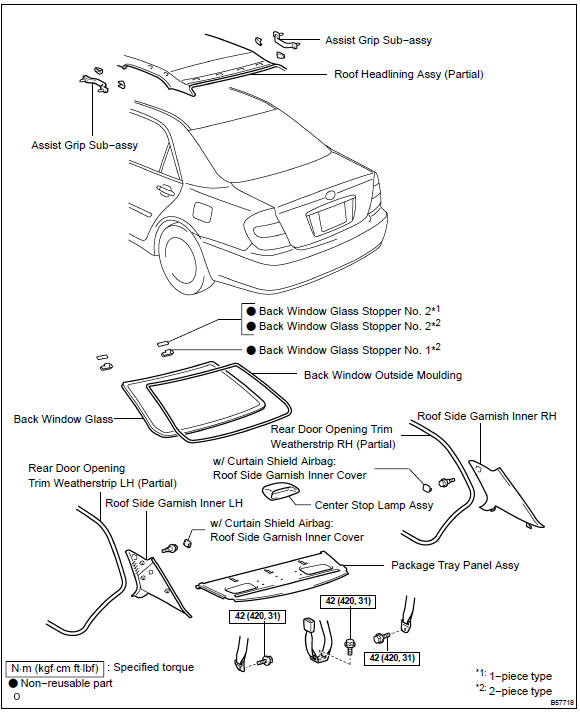
COMPONENTS
REPLACEMENT
HINT:
-
The installation procedures are the removal procedures in reverse order. However, only installation procedures requiring additional information are included.
-
A bolt without torque specification is a standard bolt
-
REMOVE REAR SEAT CUSHION ASSY
-
REMOVE REAR SEATBACK ASSY
-
REMOVE REAR DOOR OPENING TRIM WEATHERSTRIP RH
-
REMOVE REAR DOOR OPENING TRIM WEATHERSTRIP LH
-
REMOVE ROOF SIDE GARNISH INNER RH (w/o CURTAIN SHIELD AIR BAG)
-
REMOVE ROOF SIDE GARNISH INNER LH (w/o CURTAIN SHIELD AIR BAG)
-
REMOVE ROOF SIDE GARNISH INNER RH (w/ CURTAIN SHIELD AIR BAG)
-
REMOVE ROOF SIDE GARNISH INNER LH (w/ CURTAIN SHIELD AIR BAG)
-
REMOVE ROOF HEADLINING ASSY
HINT: It is not necessary to completely remove the roof headlining. Slightly lower the rear section of the roof headlining so that the back window glass can be removed later in step 13.
-
REMOVE CENTER STOP LAMP ASSY
-
REMOVE PACKAGE TRAY TRIM PANEL ASSY
-
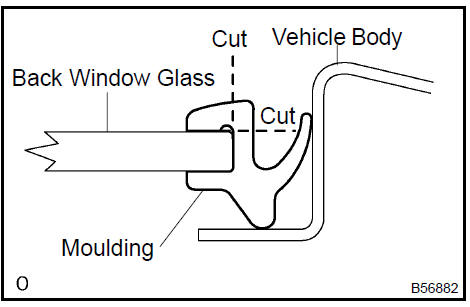
REMOVE BACK WINDOW MOULDING OUTSIDE
a. Using a knife, cut off the moulding, as shown in the illustration.
NOTICE: Be careful not to damage the vehicle body with the knife.
b. Remove the remaining moulding.
HINT: Make a partial cut in the moulding. Then pull and remove it by hand.
 Remove back window moulding outside
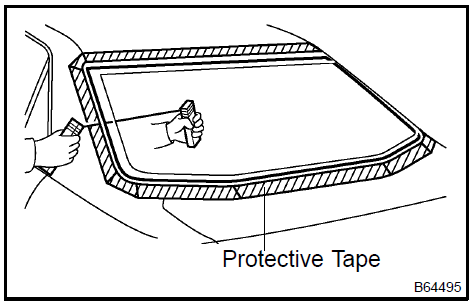
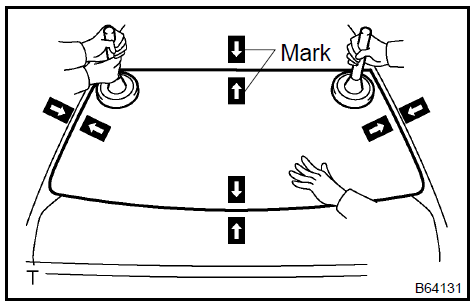
13. REMOVE BACK WINDOW GLASS
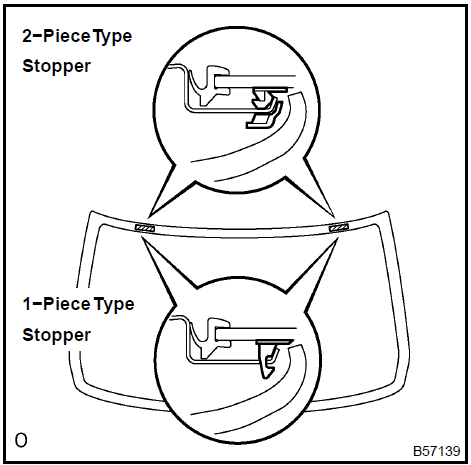
HINT: In some cases, 1−piece type and 2−piece type stoppers are installed in the same vehicle.
-
From the interior, insert piano wires between the vehicle body and glass, as shown in the illustration.
-
Tie objects that can serve as handles (for example, wooden blocks) to all wire ends.
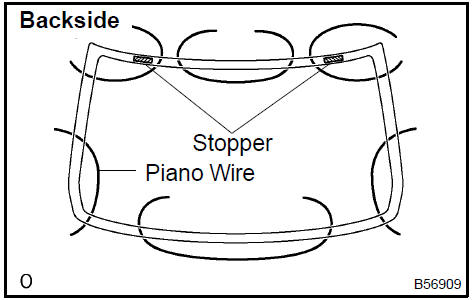
HINT: Apply protective tape to the outer surface of the vehicle body to prevent its surface from being scratched.
NOTICE: When separating the glass from the vehicle, be careful not to damage the vehicle’s paint or interior / exterior ornaments.
-
Cut through the adhesive by pulling the piano wire around the glass.
-
Disengage the stoppers.
-
Using a suction cup, remove the glass.
NOTICE: Leave as much adhesive on the vehicle body as possible when removing the glass.
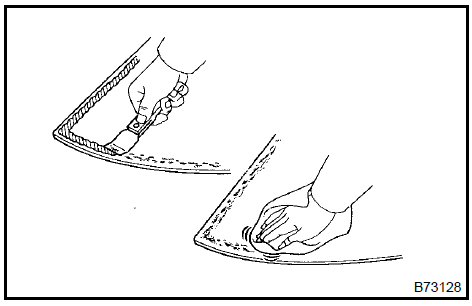
14. CLEAN BACK WINDOW GLASS
-
Using a scraper, remove the damaged stoppers and adhesive sticking to the glass.
-
Clean the outer circumference of the glass with white gasoline.
NOTICE: Do not touch the glass surface after cleaning it.
Even if using new glass, clean the glass with white gasoline.
 Clean back window glass
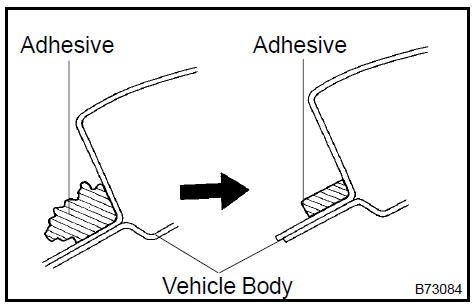
15. CLEAN VEHICLE BODY
a. Clean and shape the contact surface of the vehicle body.
1. Using a knife, cut away any rough adhesive on the contact surface of the vehicle body to ensure the appropriate surface shape.
NOTICE: Be careful not to damage the vehicle body.
HINT: Leave as much adhesive on the vehicle body as possible.
2. Clean the contact surface of the vehicle body with a piece of shop rag saturated with cleaner.
HINT: Even if all the adhesive has been removed, clean the vehicle body.
 Clean vehicle body
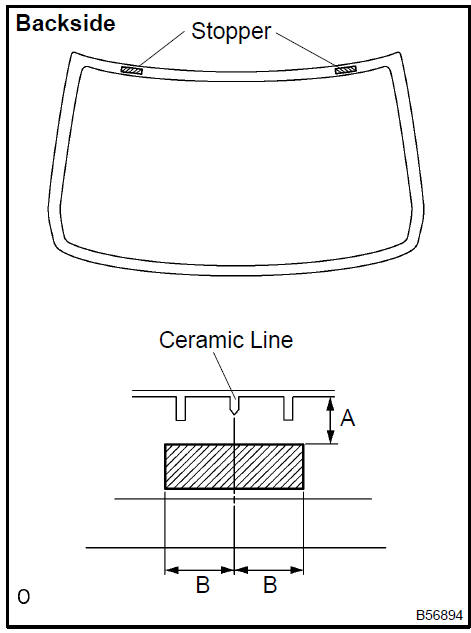
16. INSTALL BACK WINDW GLASS STOPPER No.2
a. Coat the installation part of the stopper with Primer G.
NOTICE:
-
Allow the primer coating to dry for 3 minutes or more.
-
Throw away any leftover Primer G,
-
Do not apply too much Primer G.
b. Install 2 new stoppers onto the glass, as shown in the illustration.
Specification
:

 Install back windw glass stopper No.2
17. INSTALL BACK WINDOW GLASS STOPPER No.1
a. Install 2 new stoppers to the vehicle body, as shown in the illustration.
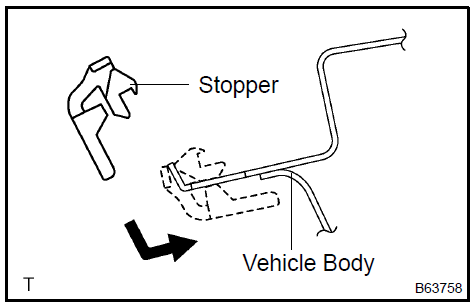 Install back window glass stopper No.1
18. INSTALL BACK WINDOW MOULDING OUTSIDE
a. Using a brush or sponge, coat the edge of the glass and the contact surface with Primer G.
NOTICE:
-
Allow the primer coating to dry for 3 minutes or more.
-
Throw away any leftover Primer G.
-
Do not apply too much Primer G.
b. Install the moulding.
19. INSTALL BACK WINDOW GLASS
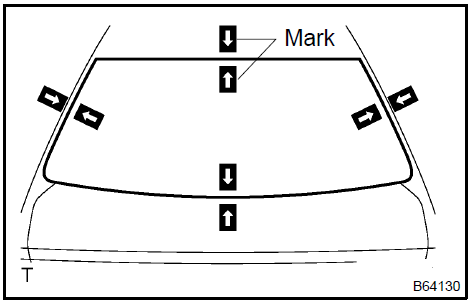
a. Position the glass.
-
Using a suction cup, place the glass in the correct position.
-
Check that the whole contact surface of the glass rim in perfectly even.
-
Place reference marks between the glass and vehicle body.
NOTICE: Check that the stoppers are attached to the vehicle body correctly.
HINT: When reusing the glass, check and correct the reference mark’s positions.
4. Using a suction cup, remove the glass.
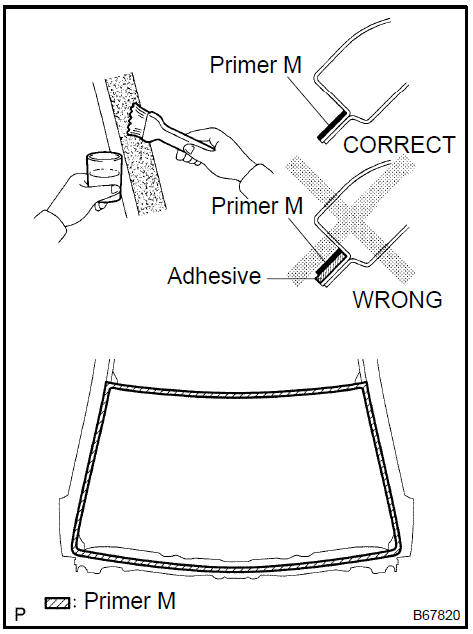
b. Using a brush, coat the exposed part of the vehicle body with Primer M.
NOTICE:
-
Allow the primer coating to dry for 3 minutes or more.
-
Do not coat the adhesive with Primer M.
-
Throw away any leftover Primer M.
-
Do not apply too much Primer M.
c. Using a brush or sponge, coat the edge of the glass and the contact surface with Primer G.
HINT: If the area other than that specified is coated by accident, wipe off the primer with a clean shop rag before it dries.
NOTICE:
-
Allow the primer coating to dry for 3 minutes or more.
-
Throw away any leftover Primer G.
-
Do not apply too much Primer G.
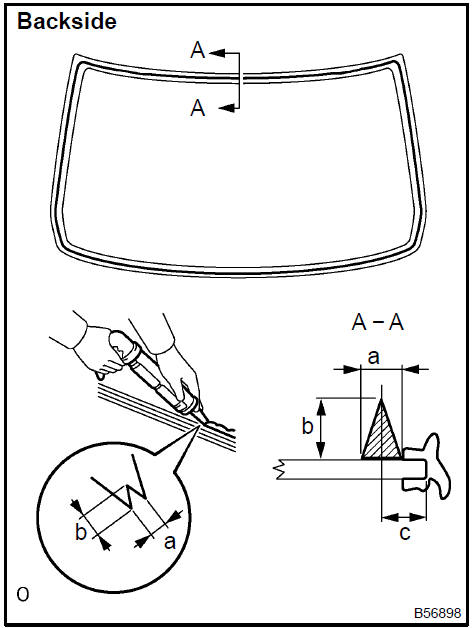
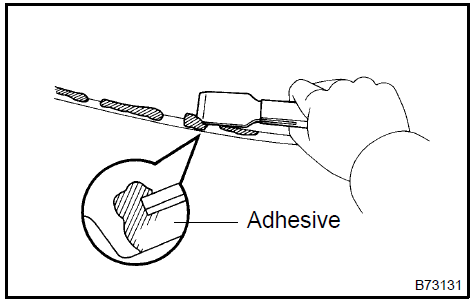
d. Apply adhesive.
Adhesive: Part No. 08850−00801 or equivalent
1. Cut off the tip of the cartridge nozzle, as shown in the illustration.
HINT: After cutting off the tip, use all adhesive within the time described in the table below.
Usage timeframe:

-
Load the sealer gun with the cartridge.
-
Coat the glass with adhesive, as shown in the illustration.
Specification
:

e. Install the glass.
1. Using a suction cup, position the glass so that the reference marks are aligned. Press it in gently along the rim.
NOTICE:
-
Allow the primer coating to dry for 3 minutes or more.
Check that the stoppers are attached to the vehicle body correctly.
-
Check that the vehicle body and glass have a small gap between them.
2. Lightly press the front surface of the glass to ensure that the glass is securely fit to the vehicle body.
3. Using a scraper, remove any excess or protruding adhesive.
HINT: Apply adhesive on the glass rim.
NOTICE: Do not drive the vehicle for the amount of time described in the table below.
Minimum time:

20. CHECK FOR LEAKS AND REPAIR
-
Conduct a leak test after the adhesive has completely hardened.
-
Seal any leaks with auto glass sealer.
Power window control system
Back window glass
Power window control system
Window defogger system
Power mirror control system
Inner rear view mirror assy
Outer rear view mirror sub-assy LH
Outer rear view mirror sub-assy LH
Windshield glass
Toyota Camry XV30 (2002–2006) Service Manual
- Introduction
- Audio & visual system
- Automatic transmission / trans
- Brake
- Clutch
- Communication system
- Cooling
- Cruise control
- Drive shaft / propeller shaft
- Emission control
- Engine control system
- Engine hood/door
- Engine mechanical
- Exhaust
- Exterior/interior trim
- Front suspension
- Fuel
- Heater & air conditioner
- Ignition
- Instrument panel/meter
- Intake
- Lighting
- Lubrication
- Manual transmission/transaxle
- Parking brake
- Power steering
- Rear suspension
- Seat
- Service specifications
- Sliding roof/convertible
- Starting & charging
- Steering column
- Supplemental restraint system
- Theft deterrent & door lock
- Tire & wheel
- Windshield/windowglass/mirror
- Wiper & washer
- Wiring
Categories
