 Toyota Camry XV30 (2002–2006) Service ManualWiper & washer
Wiper and washer system
PRECAUTION
1. PRECAUTION OF WASHER NOZZLE ADJUSTMENT
a. Do not clean or adjust the washer nozzle with a safety pin etc. because;
-
the washer nozzle tip is made of resin and could be damaged.
-
adjustment is not necessary because the washer nozzle is spray type.
b. In case the washer nozzle is clogged with wax etc., remove the objects and clean the nozzle hole with a soft resin brush etc.
Windshield wiper switch assy
REPLACEMENT
-
REMOVE STEERING COLUMN COVER
-
REMOVE WINDSHIELD WIPER SWITCH ASSY
-
Disconnect the connector.
-
Using a screwdriver, release the claw and pull out the windshield wiper switch assy.
NOTICE: Pressing the claw hard breaks the claw.
HINT: Tape the screwdriver tip before use.
 Remove windshield wiper switch assy
WIPER AND WASHER SYSTEM
PROBLEM SYMPTOMS TABLE
1. WIPER AND WASHER SYSTEM
| Symptom | Suspect Area |
| Front wipers do not operate. |
|
| Front wipers do not operate in LO or HI. |
|
| Front wipers do not operate in INT. |
|
| Front Washer motor does not operate. |
|
| Front Wipers do not operate when washer switch in ON. |
|
| Washer fluid does not operate. |
|
|
|
ON−VEHICLE INSPECTION
1. WASHER MOTOR
a. Operation Check
-
Pour the water into the washer jar with the washer motor and the pump installed to the washer jar assy.
-
Connect the battery (+) to terminal 2 of the washer motor and the pump, the battery (−) to terminal 1 of the washer motor and the pump. Check that the water comes out from the washer jar.
 Washer motor
INSPECTION
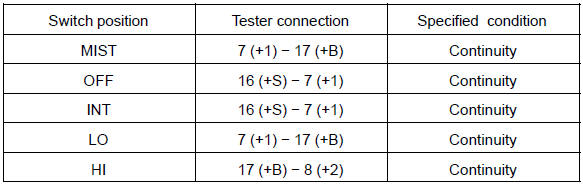
1. WINDSHIELD WIPER SWITCH ASSY
a. Continuity Check
1. Check the continuity of each terminal of the connector.
Standard:
Front Wiper Switch
Front Washer Switch

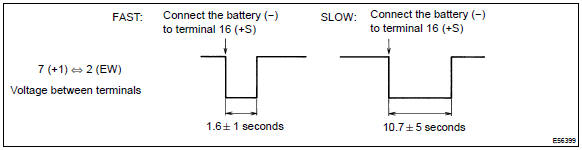
b. Intermittent Operation Check
-
Connect the voltmeter (+) terminal to terminal 7 (+1) of the connector, the voltmeter (−) terminal to terminal 2 (EW) of the connector.
-
Connect the battery (+) to terminal 17 (+B) of the connector, the battery (−) to terminal 2 (EW) and 16 (+S) of the connector.
-
Turn the wiper switch to INT.
-
Connect the battery (+) to terminal 16 (+S) of the connector for 5 seconds.
-
Connect the battery (−) to terminal 16 (+S) of the connector. Operate the intermittent wiper relay and check voltage between terminal 7 (+1) and terminal 2 (EW).
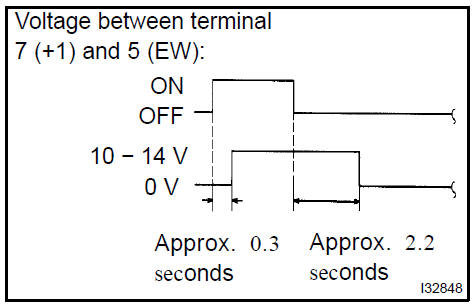
c. Operation Check (Front Wiper)
-
Turn the wiper switch to OFF.
-
Connect the battery (+) to terminal 17 (+B) of the connector, the battery (−) to terminal 16 (+S) and 2 (EW) of the connecter.
-
Connect the voltmeter (+) terminal to terminal 7 (+1) of the connector, and the voltmeter (−) terminal to terminal 2 (EW) of the connector. Turn the washer switch to ON and OFF, and check voltage between terminal 7 (+1) and terminal 2 (EW).
2. WINDSHIELD WIPER MOTOR ASSY
a. LO Operation Check
1. Connect the battery (+) to terminal 1 (+1) of the connector, the battery (−) to terminal 5 e. of the connector, and check that the motor operates at low speed (LO).
b. HI Operation Check
1. Connect the battery (+) to terminal 4 (+2) of the connector, the battery (−) to terminal 5 e. of the connector, and check that the motor operates at high speed (HI).
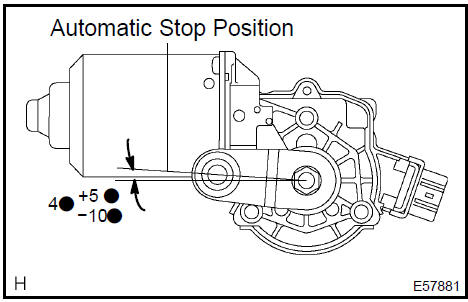
c. Automatic Stop Operation Check
-
Connect the battery (+) to terminal 1 (+1) of the connector, the battery (−) to terminal 5 e. of the connector.
With the motor being rotated at low speed (LO), disconnect terminal 1 (+1) to stop the wiper motor operation at any position except the automatic stop position.
-
Connect terminals 1 (+1) and 3 s., and the battery (+) to terminal 2 b. to restart the motor operation at low speed.
SST 09843−18040
3. Check the automatic stop position.
WINDSHIELD WIPER MOTOR ASSY
REPLACEMENT
-
REMOVE FRONT WIPER ARM HEAD CAP
-
REMOVE FR WIPER ARM LH
a. Operate the wiper and stop the windshield wiper motor assy at the automatic stop position.
-
REMOVE FR WIPER ARM RH
-
REMOVE COWL TOP VENTILATOR LOUVER SUB−ASSY
a. Remove the 6 clips and cowl top ventilator louver sub assy.
 Remove cowl top ventilator louver sub-assy
5. REMOVE WIPER LINK ASSY
-
Disconnect the connector.
-
Remove the 4 bolts and wiper link assy.
 Remove wiper link assy
6. REMOVE WINDSHIELD WIPER MOTOR ASSY
a. Disengage the meshing of rod at the clank arm pivot of the windshield wiper motor assy.
b. Remove the 3 bolts and windshield wiper motor assy from the windshield wiper link assy.
HINT: Turning the crank arm by hand prior to the operation will be able to remove the wiper motor easier.
7. INSTALL WINDSHIELD WIPER MOTOR ASSY
-
Apply grease to the clank arm pivot of the windshield wiper motor assy.
-
Install the windshield wiper motor assy with the 3 bolts to the windshield wiper link assy.
Torque: 5.4 N·m (55 kgf·cm, 48 in.Vlbf)
8. INSTALL WIPER LINK ASSY
-
Install the windshield wiper link assy with the 4 bolts.
Torque: 7.0 N·m (71 kgf·cm, 62 in.Vlbf)
-
Connect the connector.
 Install wiper link assy
9. INSTALL FR WIPER ARM RH
-
Operate the wiper, and stop the windshield wiper motor assy at the automatic stop position.
-
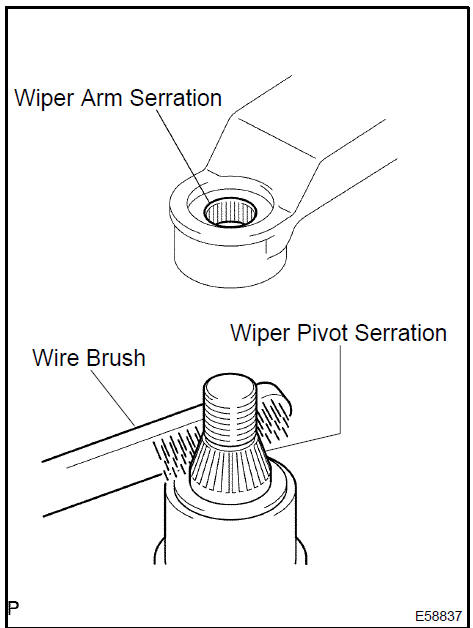
Scrape off the serration part of the wiper arm with a round file or equivalent.
-
Clean the wiper pivot serration with the wire brush.
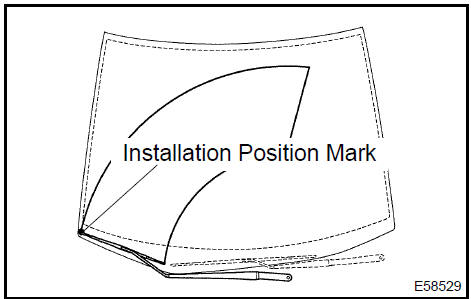
d. Align the FR wiper blade front end with the mark and install the FR wiper arm RH with the nut.
Torque: 20.1 N·m (205 kgf·cm, 15 ft·lbf)
10. INSTALL FR WIPER ARM LH
-
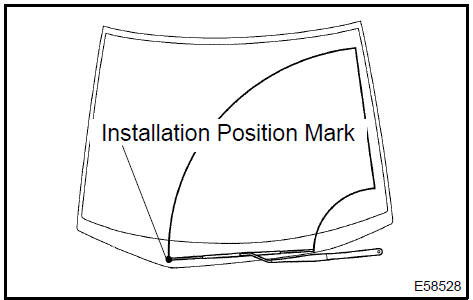
Clean the wiper pivot serration with the wire brush.
-
Align the FR wiper blade front tip with the mark and install the FR wiper arm LH with the nut.
Torque: 20.1 N·m (205 kgf·cm, 15 ft·lbf)
-
Operate the wiper while running the water or the washer fluid over the window, and check the wiping condition and that the wiper does not hit against the vehicle body.
 Install fr wiper arm LH
WIPER RUBBER LH
REPLACEMENT
1. REMOVE FR WIPER BLADE LH
a. Remove the FR wiper blade LH from the front wiper arm LH.
NOTICE: Do not fold down the front wiper arm with the front wiper blade being removed from it.
2. REMOVE WIPER RUBBER LH
-
Remove the FR wiper rubber LH from the FR wiper blade LH.
-
Remove the 2 wiper rubber backing plates from the wiper rubber LH.
3. INSTALL WIPER RUBBER LH
a. Install the 2 wiper rubber backing plates to the wiper rubber LH.
NOTICE: Be careful to observe and keep direction of curvature for correct replacement.
b. Install the wiper rubber LH so that the head part (Longer side) of the wiper rubber faces the arm axle side.
NOTICE:
-
Push in the front wiper blade into the grooves of the wiper rubber to engage them completely.
-
Put back the wiper arm of passenger side before driver side wiper arm is put back.
Introduction
Audio & visual system
Automatic transmission / trans
Brake
Clutch
Communication system
Cooling
Cruise control
Drive shaft / propeller shaft
Emission control
Engine control system
Engine hood/door
Engine mechanical
Exhaust
Exterior/interior trim
Front suspension
Fuel
Heater & air conditioner
Ignition
Instrument panel/meter
Intake
Lighting
Lubrication
Manual transmission/transaxle
Parking brake
Power steering
Rear suspension
Seat
Service specifications
Sliding roof/convertible
Starting & charging
Steering column
Supplemental restraint system
Theft deterrent & door lock
Tire & wheel
Windshield/windowglass/mirror
Wiper & washer
Wiring
Toyota Camry XV30 (2002–2006) Service Manual
- Introduction
- Audio & visual system
- Automatic transmission / trans
- Brake
- Clutch
- Communication system
- Cooling
- Cruise control
- Drive shaft / propeller shaft
- Emission control
- Engine control system
- Engine hood/door
- Engine mechanical
- Exhaust
- Exterior/interior trim
- Front suspension
- Fuel
- Heater & air conditioner
- Ignition
- Instrument panel/meter
- Intake
- Lighting
- Lubrication
- Manual transmission/transaxle
- Parking brake
- Power steering
- Rear suspension
- Seat
- Service specifications
- Sliding roof/convertible
- Starting & charging
- Steering column
- Supplemental restraint system
- Theft deterrent & door lock
- Tire & wheel
- Windshield/windowglass/mirror
- Wiper & washer
- Wiring
Categories
