 Toyota Camry XV30 (2002–2006) Service ManualSliding roof/convertible
Sliding roof (TMMK Made)
Sliding roof (TMMK Made)
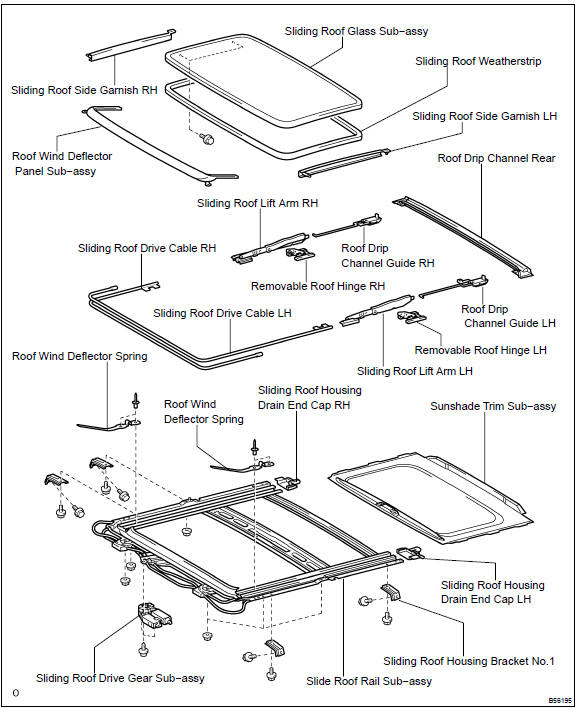
COMPONENTS
REPLACEMENT
HINT: The installation is in the reverse order of the removal. However, when there is a special point concerning the installation, it is indicated.
1. REMOVE SLIDING ROOF GLASS SUB−ASSY
-
Disengage the claws and turn the sliding roof side garnish as shown in the illustration.
-
Using a torx wrench (T25), remove the 4 screws and sliding roof glass.
 ÁÞ
Remove sliding roof glass sub?Assy
ÁÞ
Remove sliding roof glass sub?Assy
-
REMOVE SLIDING ROOF WEATHERSTRIP
-
REMOVE SLIDING ROOF DRIVE GEAR SUB−ASSY
a. Using a torx wrench (T25), remove the 3 screws and sliding roof drive gear.
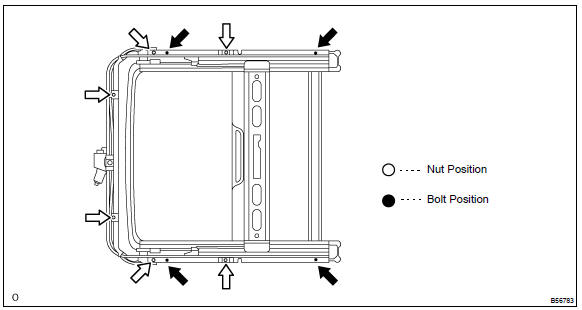
4. REMOVE SLIDE ROOF RAIL SUB−ASSY
-
Disconnect the 4 drain hoses from the housing.
-
Remove the 6 nuts and 4 bolts, then remove the slide roof rail as shown in the illustration.
 ÁÞ
Remove slide roof rail sub-Assy
ÁÞ
Remove slide roof rail sub-Assy
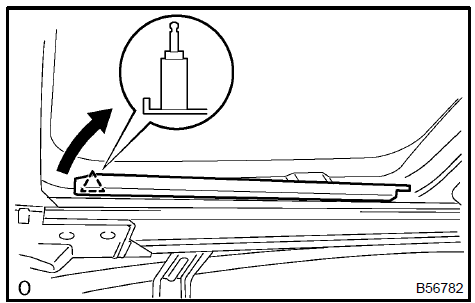
5. REMOVE SLIDING ROOF SIDE GARNISH RH
a. Using a screwdriver, remove the sliding roof side garnish.
HINT: Tape the screwdriver tip before use.
b. Use the same procedures described above on the other side.
-
REMOVE SLIDING ROOF SIDE GARNISH LH
-
REMOVE ROOF DRIP CHANNEL REAR
a. Remove the 2 screws and roof drip channel rear.
8. REMOVE SLIDING ROOF HOUSING DRAIN END CAP RH
a. Using a screwdriver, remove the sliding roof housing drain end cap.
HINT: Tape the screwdriver tip before use.
b. Use the same procedures described above on the other side.
-
REMOVE SLIDING ROOF HOUSING DRAIN END CAP LH
-
REMOVE SUNSHADE TRIM SUB−ASSY
a. Pull out the sunshade trim in the vehicle rear direction.
11. REMOVE ROOF DRIP CHANNEL GUIDE RH
-
Disengage the roof drip channel guide and sliding roof lift arm, and then pull out the roof drip channel guide in the vehicle rear direction.
-
Use the same procedures described above on the other side.
-
REMOVE ROOF DRIP CHANNEL GUIDE LH
-
REMOVE REMOVABLE ROOF HINGE RH
-
Remove the stopper screw and removable roof hinge.
-
Use the same procedures described above on the other side.
-
REMOVE REMOVABLE ROOF HINGE LH
-
REMOVE SLIDING ROOF DRIVE CABLE RH
-
REMOVE SLIDING ROOF DRIVE CABLE LH
-
REMOVE SLIDING ROOF LIFT ARM RH
-
Pull out the sliding roof lift arm in the vehicle rear direction.
-
Use the same procedures described above on the other side.
-
REMOVE SLIDING ROOF LIFT ARM LH
-
REMOVE ROOF WIND DEFLECTOR SPRING
a. Remove the rivet.
-
Use a drill of less than f 4 mm (0.16 in.).
-
Gently and vertically place the drill tip onto the rivet, and cut the rivet flanges.
A: 5 mm (0.20 in.)
NOTICE:
-
Prizing the hole with a drill can lead to damage to the rivet hole or the drill itself.
-
Be careful when undertaking this task as the cut rivet is hot.
3. Even if the flange is taken off, continue drilling and push−cut the remaining fragments with the drill.
 Remove roof wind deflector spring
-
REMOVE ROOF WIND DEFLECTOR PANEL SUB−ASSY
-
REMOVE SLIDING ROOF HOUSING BRACKET No.1
a. Remove the 4 bolts and 4 sliding roof housing bracket.
22. INSTALL ROOF WIND DEFLECTOR SPRING
a. Using an air riveter or hand riveter with a nose piece, strike the rivets into the body panel.
NOTICE:
-
If the rivet is not positioned perpendicularly, it will bend the mandrel.
-
When the trigger is pulled, it may damage SST.
 Install roof wind deflector spring
23. INSTALL SLIDING ROOF GLASS SUB−ASSY
a. Check for a difference in level between the sliding roof (weatherstrip) and roof panel.
Corner of rear side: 0 ± 1.5 mm (0 ± 0.059 in.)
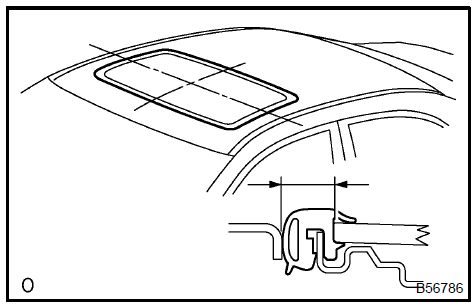 Install sliding roof glass sub-assy
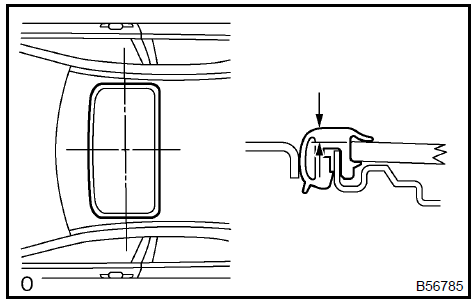
b. Check for a difference in level between the sliding roof (glass) and roof panel.
NOTICE: The clearance should be thoroughly even.
c. Adjust the roof panel.
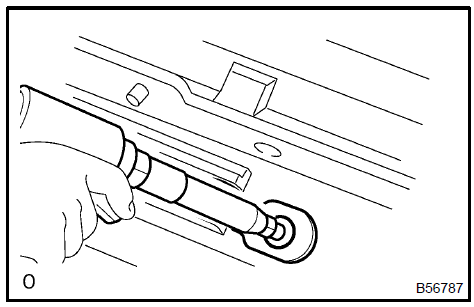
1. Using a torx) driver T25, loosen the screw to adjust the sliding roof panel position.
When the adjustment has done, tighten the screw there.
-
RESET THE SLIDING ROOF POSITION
-
INSPECT FOR LEAKS
-
Adjusting the sliding roof, check there is no water leak.
-
In case of water leak, readjust the sliding roof.
Sliding roof (TMMK Made)
Sliding roof system
Sliding roof (TMC Made)
Toyota Camry XV30 (2002–2006) Service Manual
- Introduction
- Audio & visual system
- Automatic transmission / trans
- Brake
- Clutch
- Communication system
- Cooling
- Cruise control
- Drive shaft / propeller shaft
- Emission control
- Engine control system
- Engine hood/door
- Engine mechanical
- Exhaust
- Exterior/interior trim
- Front suspension
- Fuel
- Heater & air conditioner
- Ignition
- Instrument panel/meter
- Intake
- Lighting
- Lubrication
- Manual transmission/transaxle
- Parking brake
- Power steering
- Rear suspension
- Seat
- Service specifications
- Sliding roof/convertible
- Starting & charging
- Steering column
- Supplemental restraint system
- Theft deterrent & door lock
- Tire & wheel
- Windshield/windowglass/mirror
- Wiper & washer
- Wiring
Categories
