 Toyota Camry XV30 (2002–2006) Service ManualExhaust
Exhaust pipe assy (1MZ−FE/3MZ−FE)
Exhaust pipe assy (1MZ−FE/3MZ−FE)
COMPONENTS

REPLACEMENT
1. Bank 1 sensor 2 and bank 2 sensor 2: REMOVE HEATED OXYGEN SENSOR
- Disconnect the 2 sensor connectors.
- Remove the 2 sensors.
 Remove heated oxygen sensor
2. REMOVE FRONT EXHAUST PIPE No. 1 SUPPORT BRACKET
a. Remove the 2 nuts and front support bracket.
3. REMOVE FLOOR PANEL BRACE REAR
a Remove the 2 bolts and brace.
4. REMOVE REAR EXHAUST PIPE No. 1 SUPPORT BRACKET
a. Remove the 2 bolts and rear support bracket.
5. REMOVE EXHAUST PIPE ASSY FRONT
- Remove the 2 nuts holding the manifold converter No. 2 to the pipe front.
- Remove the 2 bolts holding the manifold converter RH to the pipe front.
- Remove the 2 bolts and 2 nuts holding the center to the pipe front. Then remove the pipe front.
6. REMOVE EXHAUST PIPE ASSY CENTER
- Remove the 2 nuts from the pipe tail.
- Remove the pipe center from the 2 pipe supports.
- Remove the gasket between the pipe center and pipe tail.
7. REMOVE EXHAUST PIPE ASSY TAIL
a. Remove the pipe tail from the 3 pipe supports.
8. REMOVE TAIL PIPE BAFFLE
a. Using a plastic hammer, tap the baffle uniformly to remove it.
 Remove tail pipe baffle
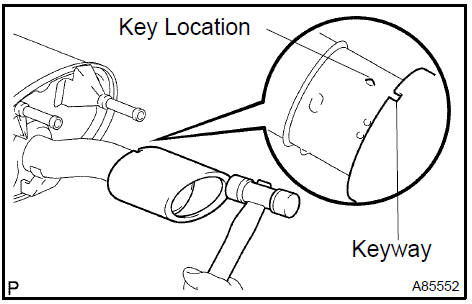
9. INSTALL TAIL PIPE BAFFLE
- Align the keyway of the baffle with the key location on the pipe assy tail.
- Using a plastic hammer, tap the baffle to install it.
 Install tail pipe baffle
10. INSTALL EXHAUST PIPE ASSY TAIL
a. Install the pipe tail to the 3 pipe supports.
11. INSTALL EXHAUST PIPE ASSY CENTER
- Install a new gasket between the pipe center and pipe tail.
- Install the pipe center to the 2 exhaust pipe supports.
- Install the pipe center with the 2 nuts.
Torque: 56 N·m (571 kgf·cm, 41 ft·lbf)
12. INSTALL EXHAUST PIPE ASSY FRONT
- Install 3 new gaskets to the pipe front.
- Install the pipe front to the manifold converter RH with the 2 bolts.
Torque: 62 N·m (632 kgf·cm, 46 ft·lbf)
- Install the pipe front to the manifold converter No. 2 Ωith the 2 nuts. Torque: 62 N·m (632 kgf·cm, 46 ft·lbf)
- Install the pipe front to the pipe center with the 2 bolts and 2 nuts.
Torque: 56 N·m (571 kgf·cm, 41 ft·lbf)
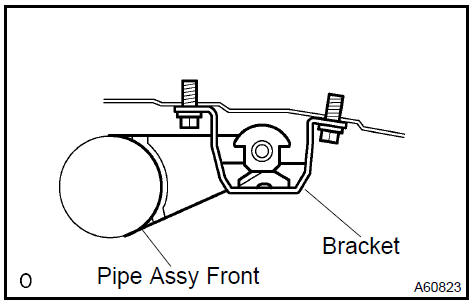
13. INSTALL REAR EXHAUST PIPE No. 1 SUPPORT BRACKET
a. Install the rear support bracket with the 2 bolts.
Torque: 33 N·m (337 kgf·cm, 24 ft·lbf)
NOTICE: Do not install the bracket facing the wrong direction.
 Install rear exhaust pipe No. 1 Support bracket
14. INSTALL FLOOR PANEL BRACE REAR
a. Install the floor panel brace with the 2 bolts.
Torque: 19.5 N·m (199 kgf·cm, 14 ft·lbf)
15. INSTALL FRONT EXHAUST PIPE No. 1 SUPPORT BRACKET
a. Install the front support bracket with the 2 nuts.
Torque: 33 N·m (337 kgf·cm, 24 ft·lbf)
NOTICE: Do not install the support bracket facing the wrong direction.
 Install front exhaust pipe No. 1 Support bracket
16. Bank 1 sensor 2 and bank 2 sensor 2: INSTALL HEATED OXYGEN SENSOR
- Install the 2 sensors.
Torque: 44 N·m (449 kgf·cm, 32 ft·lbf)
- Connect the 2 sensor connectors.
17. CHECK FOR EXHAUST GAS LEAKS
If the exhaust pipe is loose, tighten it.
If damaged, replace it.
Exhaust pipe assy (2AZ−FE)(From July, 2003)
Exhaust pipe assy (1MZ−FE/3MZ−FE)
Toyota Camry XV30 (2002–2006) Service Manual
- Introduction
- Audio & visual system
- Automatic transmission / trans
- Brake
- Clutch
- Communication system
- Cooling
- Cruise control
- Drive shaft / propeller shaft
- Emission control
- Engine control system
- Engine hood/door
- Engine mechanical
- Exhaust
- Exterior/interior trim
- Front suspension
- Fuel
- Heater & air conditioner
- Ignition
- Instrument panel/meter
- Intake
- Lighting
- Lubrication
- Manual transmission/transaxle
- Parking brake
- Power steering
- Rear suspension
- Seat
- Service specifications
- Sliding roof/convertible
- Starting & charging
- Steering column
- Supplemental restraint system
- Theft deterrent & door lock
- Tire & wheel
- Windshield/windowglass/mirror
- Wiper & washer
- Wiring
Categories
