 Toyota Camry XV30 (2002–2006) Service ManualSeat
Front seat belt
Front seat belt
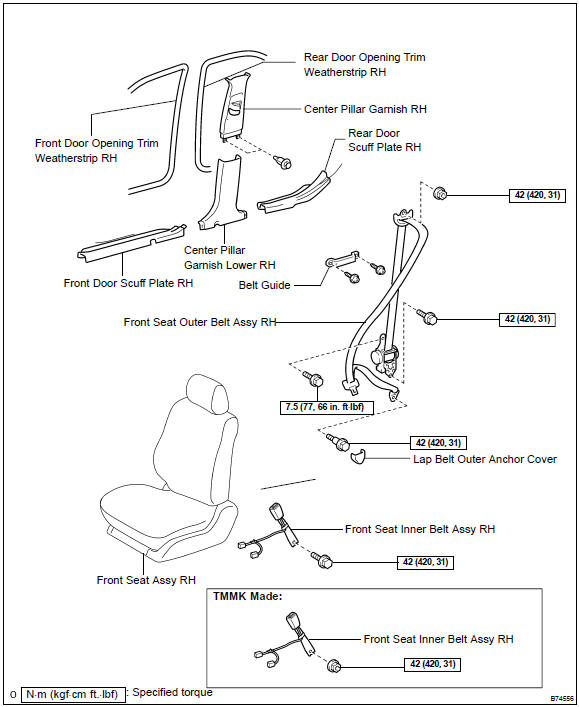
COMPONENTS
REPLACEMENT
HINT:
-
The installation is in the reverse order of the removal. However, when there is a special point concerning the installation, it is indicated.
-
On the RH side, use the same procedures as on the LH side.
-
DISCONNECT BATTERY NEGATIVE TERMINAL
-
REMOVE FRONT SEAT ASSY RH
-
REMOVE FRONT DOOR SCUFF PLATE RH
-
REMOVE FRONT DOOR OPENING TRIM WEATHERSTRIP RH
-
REMOVE REAR DOOR SCUFF PLATE RH
-
REMOVE REAR DOOR OPENING TRIM WEATHERSTRIP RH
-
REMOVE LAP BELT OUTER ANCHOR COVER
-
REMOVE CENTER PILLAR GARNISH LOWER RH
-
REMOVE CENTER PILLAR GARNISH UPPER RH
-
REMOVE FRONT SEAT OUTER BELT ASSY RH
-
Remove the 2 screws and belt guide.
-
Remove the nut and the shoulder anchor.
NOTICE: When removing the seat belt pretensioner, operation must be started after 90 seconds have passed from the time the ignition switch is turned to the LOCK position and the negative (−) terminal cable is disconnected from the battery.
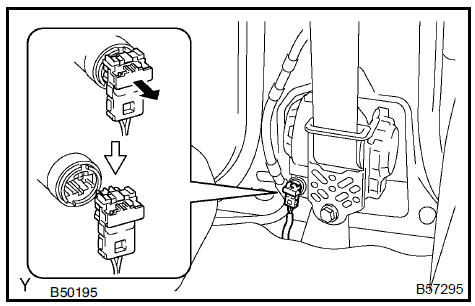
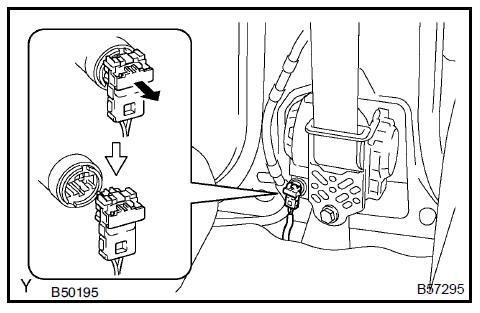
c. Disconnect the connector.
1. Using a screwdriver, pull the locking button of the pretensioner connector to your side to release the lock.
HINT: Tape the screwdriver tip before use.
d. Remove the 2 bolts and the front seat outer belt assembly.
11. REMOVE FRONT SEAT INNER BELT ASSY RH
-
Disconnect the connector and clamp.
-
TMC made: Remove the bolt and the front seat inner belt assembly.
-
TMMK made: Remove the nut and the front seat inner belt assembly.
12. INSTALL FRONT SEAT INNER BELT ASSY RH
-
TMC made: Install the front seat inner belt assembly with the bolt.
Torque: 42 N·m (420 kgf·cm, 31 ft·lbf)
-
TMMK made: Install the front seat inner belt assembly with the nut.
Torque: 42 N·m (420 kgf·cm, 31 ft·lbf)
13. INSTALL FRONT SEAT OUTER BELT ASSY RH
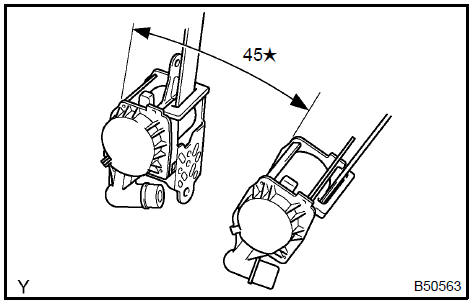
a. Check the degree of tilt when beginning to lock the ELR.
1. Make sure that the belt cannot be pulled out by over 45 degrees of tilt.
NOTICE: Do not disassemble the retractor.
-
Install the retractor with the 2 bolts.
Torque: 7.5 N·m (80 kgf·cm, 66 in.·lbf) (Upper part of retractor) 42 N·m (420 kgf·cm, 31 ft·lbf) (Lower part of retractor)
-
Install the shoulder anchor with the nut.
Torque: 42 N·m (420 kgf·cm, 31 ft·lbf)
-
Install the floor anchor with the bolt.
Torque: 42 N·m (420 kgf·cm, 31 ft·lbf)
-
Check the ELR lock.
1. Check that the seat belt is locked when the seat belt is pulled out quickly with the seat belt installed in the vehicle.
 Install front seat outer belt assy RH
DISPOSAL
HINT: When scrapping vehicles equipped with a seat belt pretensioner or disposing of a front seat outer belt (with seat belt pretensioner) always first active the seat belt pretensioner in accordance with the procedures described below. If any abnormality occurs in the seat belt pretensioner operation, contact the SERVICE DEPT.
of the TOYOTA MOTOR SALES, U.S.A., INC. When disposing of a front seat outer belt (with seat belt pretensioner) activated in a collision, follow the same procedures given in step 1−d. in DISPOSAL.
CAUTION:
-
Never dispose of front seat outer belt which has an inactivated pretensioner.
-
The seat belt pretensioner produces a sizeable exploding sound when it activates, so perform operation out−of−door and where it will not create a nuisance to nearby residents.
-
When activating a front seat outer belt (with seat belt pretensioner), perform the operation at least 10 m (33 ft) away from the front seat outer belt.
-
Use gloves and safety glasses when handling a front seat belt with an activated pretensioner.
-
Always wash your hands with water after completing operation.
-
Do not apply water, etc. to a front seat outer belt with an activated pretensioner.
-
When activating the seat belt pretensioner, always use the specified SST. (09062−00700, 09082−00770) (SRS Airbag Deployment Tool) Perform the operation in a place away from electrical noise.

1. DISPOSE OF FRONT SEAT OUTER BELT ASSY RH (WHEN SCRAPPING VEHICLE DEPLOYMENT METHOD)
HINT: Check that the battery positive voltage is above 12 V.
a. Check functioning of SST.
CAUTION: When activating the seat belt pretensioner, always use a specified SST.
1. Connect the SST to the battery.
Connect the red clip of the SST to the battery positive (+) terminal and the black clip to the battery negative (−) terminal.
HINT: Do not connect the yellow connector which will be connected to the seat belt pretensioner.
2. Check the functioning of SST.
Press SST activation switch, and check that the LED of SST activation switch lights up.
CAUTION: If the LED lights up when the activation switch is not pressed, SST probably malfunctions, so definitely do not use SST.
b. Disconnect the pretensioner connector.
-
Remove the front door scuff plate RH
-
Remove the rear door scuff plate RH
-
Remove the front door opening trim weather strip RH
-
Remove the rear door opening trim weather strip RH
-
Remove the center pillar garnish lower RH
-
Remove the center pillar garnish upper RH
-
Disconnect the pretensioner connector as shown in the illustration.
-
Install the floor anchor of the seat belt.
c. Install SST.
1. Connect 2 SST, then connect them to the seat belt pretensioner.
NOTICE: To avoid damaging SST connector and wire harness, do not lock the secondary lock of the twin lock.
-
Move SST at least 10 m (33 ft) away from the front of the vehicle.
-
Close all the doors and windows of the vehicle.
NOTICE: Take care not to damage the SST wire harness.
4. Connect SST red clip to the battery positive (+) terminal and the black clip to the negative (−) terminal.

d. Activate the seat belt pretensioner.
-
Confirm that no one is inside the vehicle or within 10 m (33 ft) area around the vehicle.
-
Press SST activation switch and activate the seat belt pretensioner.
HINT: The seat belt pretensioner operates simultaneously with the LED of SST activation switch lighting up.
e. Dispose of the front seat outer belt (with seat belt pretensioner).
CAUTION:
-
The rear outer belt is very hot when the seat belt pretensioner is activated, so leave it alone for at least 30 minutes after activation.
-
Use gloves and safety glasses when handling a front seat outer belt with activated seat belt pretensioner.
-
Always wash your hands with water after completing the operation.
-
Do not apply water, etc. to a front seat outer belt with activated seat belt pretensioner.
HINT: When scrapping a vehicle, activate the seat belt pretensioner and scrap the vehicle with the activated front seat outer belt being installed.
2. DISPOSE OF FRONT SEAT OUTER BELT ASSY RH (WHEN DISPOSING OF AIRBAG ASSEMBLY DEPLOYMENT METHOD)
NOTICE:
-
When disposing of a front seat outer belt (with seat belt pretensioner) only, never use the customer’s vehicle to activate the seat belt pretensioner.
-
Be sure to follow the procedures given on the next page when activating the seat belt pretensioner.
a. Remove the front seat outer belt .
HINT: Cut the belt near the seat belt retractor.
b. Check functioning of SST (See step 1−a.).
c. Install SST.
1. Connect 2 SST, then connect them to the seat belt pretensioner.
NOTICE: To avoid damaging SST connector and wire harness, do not lock the secondary lock of the twin lock.
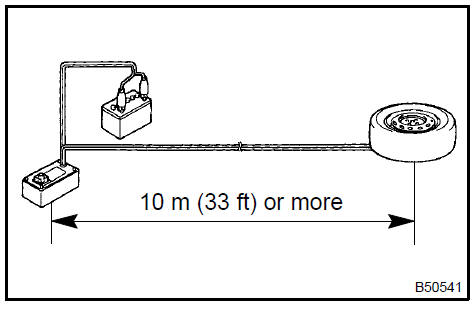
2. Place the front seat outer belt on the ground and cover it with the disc wheel with tire.
NOTICE: Place the front seat outer belt as shown in the illustration.
3. Move SST at least 10 m (33 ft) away from the wheel disc.
NOTICE: Take care not to damage SST wire harness.
d. Activate the seat belt pretensioner.
-
Connect SST red clip to the battery positive (+) terminal and black clip to the battery negative (−) terminal.
-
Check that no one is within 10 m (33 ft) area around the disc wheel.
-
Press SST activation switch and activate the seat belt pretensioner.
HINT: The seat belt pretensioner operates simultaneously with the LED of SST activation switch lighting up.
e. Dispose of the front seat outer belt (with seat belt pretensioner).
-
Remove the disc wheel and SST.
-
Place the front seat outer belt in a vinyl bag, tie the end tightly and dispose of it in the same way as other general parts.

Front power seat control system (From July, 2003)
Seat heater system
Front seat assembly (Manual seat type)
Front seat assembly (power seat type)
Front power seat control system (From July, 2003)
Rear seat assembly
Front power seat control system (From July, 2003)
Seat belt warning system (From July, 2003)
Rear seat belt
Seat belt warning system (From July, 2003)
Front seat belt
Toyota Camry XV30 (2002–2006) Service Manual
- Introduction
- Audio & visual system
- Automatic transmission / trans
- Brake
- Clutch
- Communication system
- Cooling
- Cruise control
- Drive shaft / propeller shaft
- Emission control
- Engine control system
- Engine hood/door
- Engine mechanical
- Exhaust
- Exterior/interior trim
- Front suspension
- Fuel
- Heater & air conditioner
- Ignition
- Instrument panel/meter
- Intake
- Lighting
- Lubrication
- Manual transmission/transaxle
- Parking brake
- Power steering
- Rear suspension
- Seat
- Service specifications
- Sliding roof/convertible
- Starting & charging
- Steering column
- Supplemental restraint system
- Theft deterrent & door lock
- Tire & wheel
- Windshield/windowglass/mirror
- Wiper & washer
- Wiring
Categories
