 Toyota Camry XV30 (2002–2006) Service ManualSeat
Rear seat belt
Rear seat belt
COMPONENTS
REAR SEAT BELT (TMC MADE)
REPLACEMENT
HINT:
-
The installation is in the reverse order of the removal. However, when there is a special point concerning the installation, it is indicated.
-
On the RH side, use the same procedures as on the LH side.
-
REMOVE REAR SEAT CUSHION ASSY
-
REMOVE ROOF SIDE GARNISH INNER RH
-
REMOVE ROOF SIDE GARNISH INNER LH
-
REMOVE CENTER STOP LAMP ASSY
-
REMOVE REAR SEAT SHOULDER BELT COVER RH
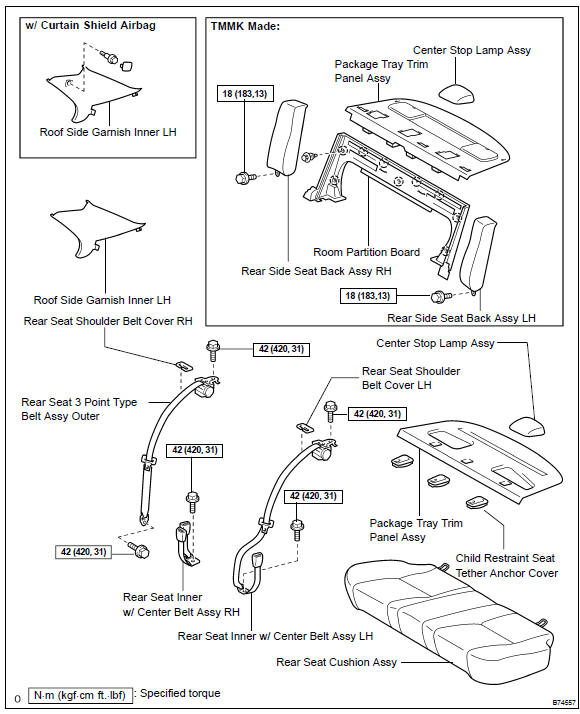
a. Using a screwdriver, disengage the claws in the front side.
HINT: Tape the screwdriver tip before use.
-
Pull out the shoulder belt cover to the front side to disengage the claws.
-
Pull out the shoulder belt from the slit to remove the shoulder belt cover.
 Remove rear seat shoulder belt cover RH
-
REMOVE REAR SIDE SEAT BACK ASSY RH
-
REMOVE REAR SIDE SEAT BACK ASSY LH
-
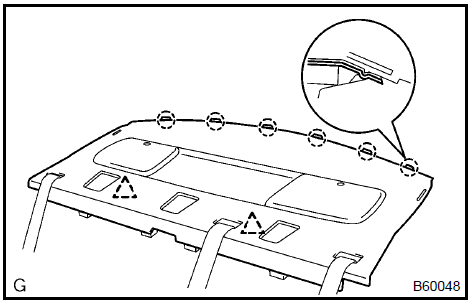
REMOVE PACKAGE TRAY TRIM PANEL ASSY
-
Remove the 3 bolts and floor anchor of the seat belt.
-
Disengage the clips and claws and pull out the belt to remove the package tray trim.
 Remove package tray trim panel assy
9. REMOVE REAR SEAT 3 POINT TYPE BELT ASSY OUTER
a. Remove the bolt in the retractor, and disengage the claws of the stopper to remove the rear seat belt assembly outer.
10. REMOVE REAR SEAT INNER W/CENTER BELT ASSY RH
a. Remove the bolt, and disengage the claws of the stopper to remove the rear seat inner with center belt assembly RH.
11. REMOVE REAR SEAT INNER W/CENTER BELT ASSY LH
a. Remove the bolt in the retractor, and remove the rear seat inner with center belt assembly LH.
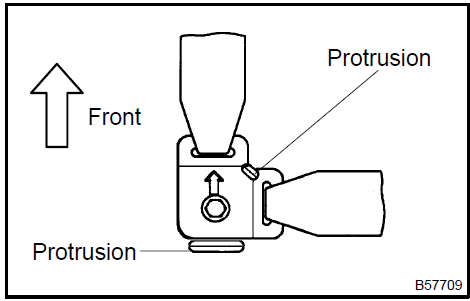
12. INSTALL REAR SEAT INNER W/CENTER BELT ASSY RH
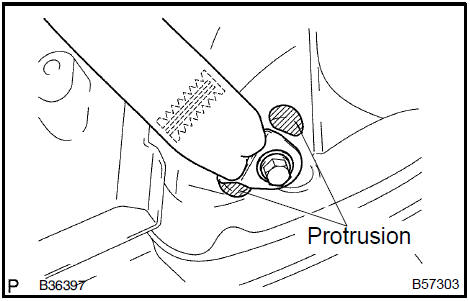
a. Install the floor anchor with the bolt.
Torque: 42 N·m (420 kgf·cm, 31 ft·lbf)
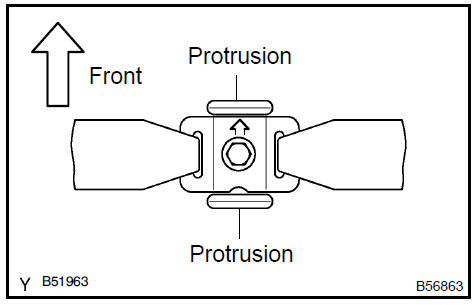
NOTICE: Take care for the anchor not to run onto the protrusion part of the floor panel.
 Install rear seat inner w/center belt assy RH
13. INSTALL REAR SEAT 3 POINT TYPE BELT ASSY OUTER
-
Install the retractor with the bolt.
Torque: 42 N·m (420 kgf·cm, 31 ft·lbf)
-
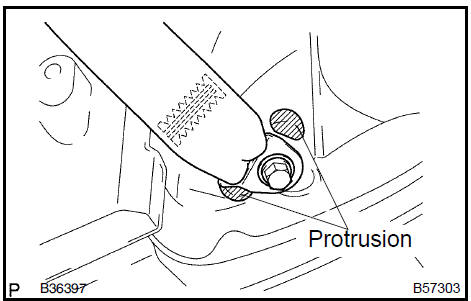
Install the anchor of the rear seat 3 point type belt assembly outer RH with the bolt.
Torque: 42 N·m (420 kgf·cm, 31 ft·lbf)
NOTICE: Take care for the anchor not to run onto the protrusion part of the floor panel.
c. Check the degree of tilt when the belt begins to lock the ELR.
1. Check the degree in the same way as the rear seat inner with center belt assembly RH.
d. Check the ELR lock.
1. Check that the belt will lock when pulling out the belt quickly with the belt installed.
e. Check the fastening function for child restraint system.
1. Check the function in the same way as the rear seat inner with center belt assembly RH.
 Install rear seat 3 point type belt assy outer
14. INSTALL REAR SEAT INNER W/CENTER BELT ASSY LH
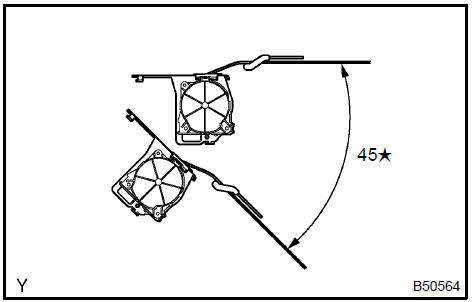
a. Check the degree of tilt when the belt begins to lock the ELR.
1. Check the belt will not lock within 15 degrees of tilt in all the direction but the belt will lock over 45 degrees of tilt when moving the installed retractor gently.
-
Install the retractor with the bolt.
Torque: 42 N·m (420 kgf·cm, 31 ft·lbf)
-
Check the ELR lock.
1. Check that the belt will lock when pulling out the belt quickly with the belt installed.
d. Check the fastening function for child restraint system.
NOTICE: Check should be done with the assembly installed.
-
Check that the belt cannot be pulled out any more but can be rewound after the belt is fully pulled out.
-
Check that the belt can be pulled out and rewound after the belt is fully rewound.
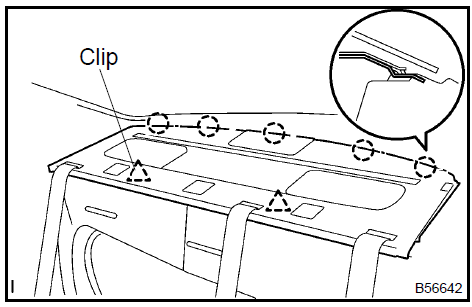
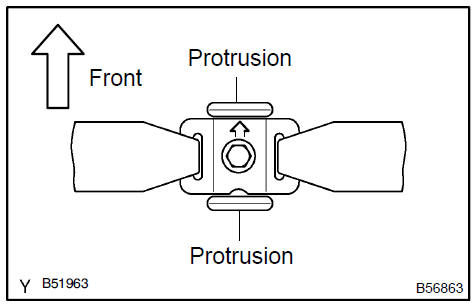
e. Install the floor anchor with the bolt, directing an arrow mark on the plate to the vehicle’s front direction.
Torque: 42 N·m (420 kgf·cm, 31 ft·lbf)
NOTICE: Take care for the anchor not to run onto the protrusion part of the floor panel.
f. Check the ELR lock.
1. Check that the belt will lock when pulling out the belt quickly with the belt installed.
REAR SEAT BELT (TMMK MADE)
REPLACEMENT
HINT:
-
The installation is in the reverse order of the removal. However, when there is a special point concerning the installation, it is indicated.
-
On the RH side, use the same procedures as on the LH side.
-
REMOVE REAR SEAT CUSHION ASSY
-
REMOVE ROOF SIDE GARNISH INNER RH
-
REMOVE ROOF SIDE GARNISH INNER LH
-
REMOVE CENTER STOP LAMP ASSY
-
REMOVE REAR SEAT SHOULDER BELT COVER RH
a. Using a screwdriver, disengage the claws in the front side.
HINT: Tape the screwdriver tip before use.
-
Pull out the shoulder belt cover to the front side to disengage the claws.
-
Pull out the shoulder belt from the slit to remove the shoulder belt cover.
 Remove rear seat shoulder belt cover RH
-
REMOVE REAR SIDE SEAT BACK ASSY RH
-
REMOVE REAR SIDE SEAT BACK ASSY LH
-
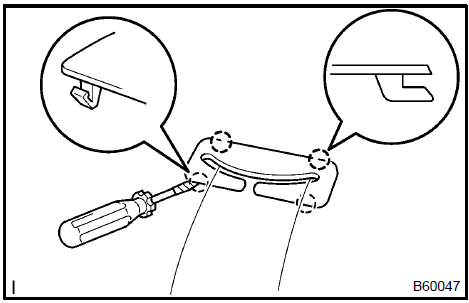
REMOVE ROOM PARTITION BOARD ASSY
a. Remove the 9 clips and room partition board.
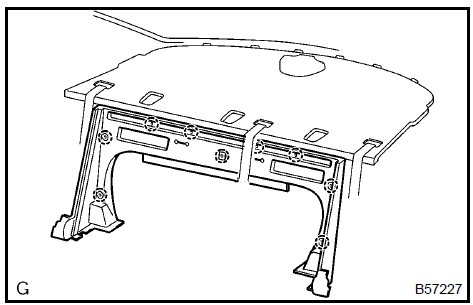 Remove room partition board assy
9. REMOVE PACKAGE TRAY TRIM PANEL ASSY
-
Remove the 3 bolts and floor anchor of the seat belt.
-
Disengage the clips and claws and pull out the belt to remove the package tray trim.
 Remove package tray trim panel assy
10. REMOVE REAR SEAT 3 POINT TYPE BELT ASSY OUTER
a. Remove the bolt in the retractor, and disengage the claws of the stopper to remove the rear seat belt assembly outer.
11. REMOVE REAR SEAT INNER W/CENTER BELT ASSY RH
a. Remove the bolt, and disengage the claws of the stopper to remove the rear seat inner with center belt assembly RH.
12. REMOVE REAR SEAT INNER W/CENTER BELT ASSY LH
a. Remove the bolt in the retractor, and remove the rear seat inner with center belt assembly LH.
13. INSTALL REAR SEAT INNER W/CENTER BELT ASSY RH
a. Install the floor anchor with the bolt.
Torque: 42 N·m (420 kgf·cm, 31 ft·lbf)
NOTICE: Take care for the anchor not to run onto the protrusion part of the floor panel.
 Install rear seat inner W/center belt assy RH
14. INSTALL REAR SEAT 3 POINT TYPE BELT ASSY OUTER
-
Install the retractor with the bolt.
Torque: 42 N·m (420 kgf·cm, 31 ft·lbf)
-
Install the anchor of the rear seat 3 point type belt assembly outer RH with the bolt.
Torque: 42 N·m (420 kgf·cm, 31 ft·lbf)
NOTICE: Take care for the anchor not to run onto the protrusion part of the floor panel.
c. Check the degree of tilt when the belt begins to lock the ELR.
1. Check in the same way as the rear seat inner with center belt assembly RH.
d. Check the ELR lock.
1. Check the degree that the belt will lock when pulling out the belt quickly with the belt installed.
e. Check the fastening function for child restraint system.
1. Check the function in the same way as the rear seat inner with center belt assembly RH.
 Install rear seat 3 point type belt assy outer
15. INSTALL REAR SEAT INNER W/CENTER BELT ASSY LH
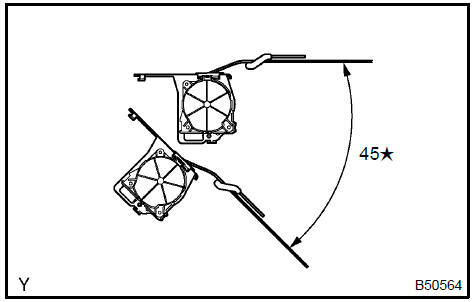
a. Check the degree of tilt when the belt begins to lock the ELR.
1. Check the belt will not lock within 15 degrees of tilt in all the direction but the belt will lock over 45 degrees of tilt when moving the installed retractor gently.
-
Install the retractor with the bolt.
Torque: 42 N·m (420 kgf·cm, 31 ft·lbf)
-
Check the ELR lock.
1. Check that the belt will lock when pulling out the belt quickly with the belt installed.
d. Check the fastening function for child restraint system.
NOTICE: Check should be done with the assembly installed.
-
Check that the belt cannot be pulled out any more but can be rewound after the belt is fully pulled out.
-
Check that the belt can be pulled out and rewound after the belt is fully rewound.
e. Install the floor anchor with the bolt, directing an arrow mark on the plate to the vehicle’s front direction.
Torque: 42 N·m (420 kgf·cm, 31 ft·lbf)
NOTICE: Take care for the anchor not to run onto the protrusion part of the floor panel.
f. Check the ELR lock.
1. Check that the belt will lock when pulling out the belt quickly with the belt installed.
Front power seat control system (From July, 2003)
Seat heater system
Front seat assembly (Manual seat type)
Front seat assembly (power seat type)
Front power seat control system (From July, 2003)
Rear seat assembly
Front power seat control system (From July, 2003)
Seat belt warning system (From July, 2003)
Rear seat belt
Seat belt warning system (From July, 2003)
Front seat belt
Toyota Camry XV30 (2002–2006) Service Manual
- Introduction
- Audio & visual system
- Automatic transmission / trans
- Brake
- Clutch
- Communication system
- Cooling
- Cruise control
- Drive shaft / propeller shaft
- Emission control
- Engine control system
- Engine hood/door
- Engine mechanical
- Exhaust
- Exterior/interior trim
- Front suspension
- Fuel
- Heater & air conditioner
- Ignition
- Instrument panel/meter
- Intake
- Lighting
- Lubrication
- Manual transmission/transaxle
- Parking brake
- Power steering
- Rear suspension
- Seat
- Service specifications
- Sliding roof/convertible
- Starting & charging
- Steering column
- Supplemental restraint system
- Theft deterrent & door lock
- Tire & wheel
- Windshield/windowglass/mirror
- Wiper & washer
- Wiring
Categories
