 Toyota Camry XV30 (2002–2006) Service ManualFuel
Fuel pump assy (2AZ−FE)(From July, 2003)
Fuel pump assy (2AZ−FE)(From July, 2003)
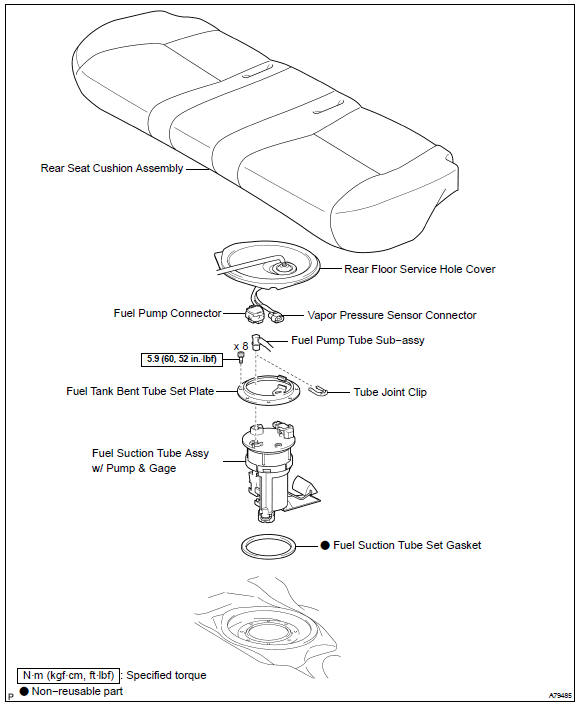
COMPONENTS
REPLACEMENT
- DISCHARGE FUEL SYSTEM PRESSURE
- REMOVE REAR SEAT CUSHION ASSEMBLY
- REMOVE REAR FLOOR SERVICE HOLE COVER
- Remove the rear floor service hole cover.
- Disconnect the vapor pressure sensor connector.
- Disconnect the fuel pump connector.
 Remove rear floor service hole cover
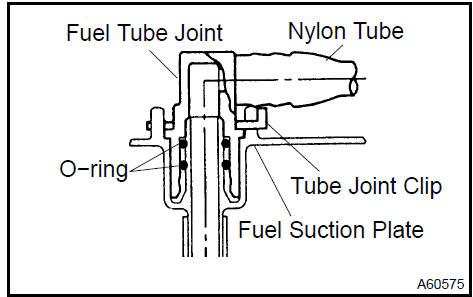
4. SEPARATE FUEL PUMP TUBE SUB−ASSY
a. Remove the tube joint clip, and pull out the fuel pump tube.
NOTICE:
- Before this operation, check the connector for dirt, mud or other contamination.
- Be careful of mud. The connector’s O−ring, which seals the pipe and connector, becomes contaminated easily.
- Do not use any tool in this operation.
- Do not bend or twist the nylon tube. Protect the connector by covering it with a vinyl or plastic bag.
- When the pipe and the connector are stuck, push and pull the connector to release it. Then pull out the connector from the pipe.
5. REMOVE FUEL TANK VENT TUBE SET PLATE
a. Remove the 8 bolts and the set plate.
6. REMOVE FUEL SUCTION TUBE ASSY W/ PUMP & GAGE
a. Remove the fuel suction tube from the fuel tank.
NOTICE:
- Do not damage the fuel pump filter.
- Do not bend the arm of the fuel sender gage.
b. Remove the gasket from the fuel suction tube.
 Remove fuel suction tube assy W/ pump & gage
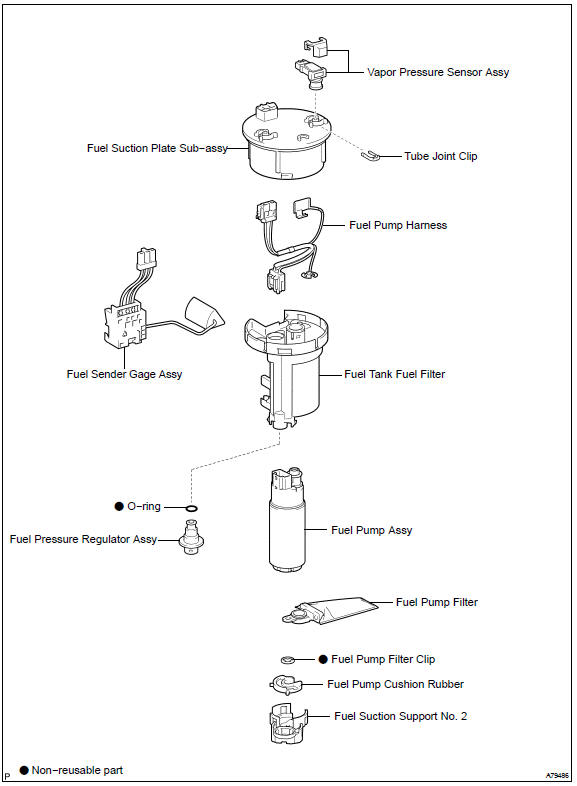
7. REMOVE VAPOR PRESSURE SENSOR ASSY
- Remove the cover.
- Remove the tube joint clip, and pull out the vapor pressure sensor.
 Remove vapor pressure sensor assy
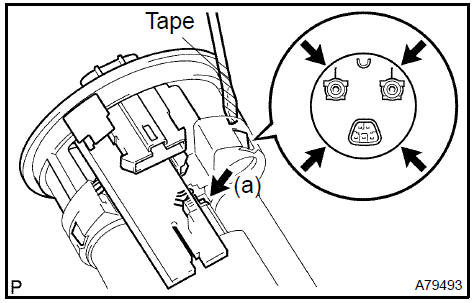
8. REMOVE FUEL SUCTION SUPPORT No.2
a. Using a screwdriver with its tip wrapped in tape, detach the 5 snap claws from the claw holes, and remove the fuel suction support.
NOTICE: Do not damage the fuel suction support.
 Remove fuel suction support No.2
9. REMOVE FUEL PUMP CUSHION RUBBER
 Remove fuel pump cushion rubber
10. REMOVE FUEL SENDER GAGE ASSY
- Disconnect the fuel sender gage connector.
- Using a screwdriver with its tip wrapped in tape, unfasten the clamp to release the fuel sender gage. Slide the fuel sender gage to remove it from the fuel pump.
 Remove fuel sender gage assy
11. REMOVE FUEL SUCTION PLATE SUB−ASSY
- Disconnect the fuel pump connector.
- Using a screwdriver with its tip wrapped in tape, detach the 4 snap claws from the claw holes, and pull out the fuel suction plate.
NOTICE: Do not damage the fuel suction support.
 Remove fuel suction plate sub-assy
12. REMOVE FUEL PUMP HARNESS
- Disconnect the connector.
- Using a small screwdriver, pry out the fuel pump harness.
 Remove fuel pump harness
13. REMOVE FUEL PUMP
a. Pull out the fuel pump from the fuel tank fuel filter.
 Remove fuel pump
14. REMOVE FUEL PUMP FILTER
- Using a small screwdriver, pry out the clip.
- Pull out the fuel pump filter from the fuel pump.
 Remove fuel pump filter
15. REMOVE FUEL PRESSURE REGULATOR ASSY
- Pull out the fuel pressure regulator from the fuel tank fuel filter.
- Remove the O−ring from the fuel pressure regulator.
 Remove fuel pressure regulator assy
16. INSTALL FUEL PRESSURE REGULATOR ASSY
- Apply a light coat of gasoline or grease to a new O−ring, and install it to the fuel pressure regulator.
- Push in the fuel pressure regulator to the fuel tank fuel filter.
17. INSTALL FUEL PUMP FILTER
a. Install the fuel pump filter with a new clip.
18. INSTALL FUEL PUMP
- Apply a light coat of gasoline or grease to the O−ring of the fuel pump.
- Push in the fuel pump to the fuel tank fuel filter.
- INSTALL FUEL PUMP HARNESS
- INSTALL FUEL SUCTION PLATE SUB−ASSY
- INSTALL FUEL SENDER GAGE ASSY
- INSTALL FUEL PUMP CUSHION RUBBER
- INSTALL FUEL SUCTION SUPPORT No.2
- INSTALL VAPOR PRESSURE SENSOR ASSY
- INSTALL FUEL SUCTION TUBE ASSY W/ PUMP & GAGE
- Install a new gasket to the fuel suction tube.
- Install the fuel suction tube.
NOTICE:
- Do not damage the fuel pump filter.
- Do not bend the arm of the fuel sender gage.
26. INSTALL FUEL TANK VENT TUBE SET PLATE
- Align the mark of the set plate with the fuel suction tube.
- Install the set plate with the 8 bolts.
Torque: 5.9 N·m (60 kgf·cm, 52 in.Vlb
 Install fuel tank vent tube set plate
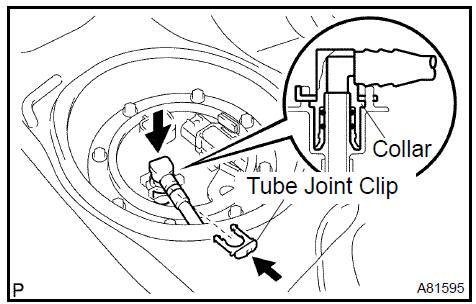
27. CONNECT FUEL PUMP TUBE SUB−ASSY
a. Install the fuel pump tube with the tube joint clip.
NOTICE:
- Check that there are no scratches or foreign objects on the connecting part.
- Check that the fuel tube joint is inserted securely.
- Check that the tube joint clip is on the collar of the fuel tube joint.
- After installing the tube joint clip, check that the fuel tube joint has not been pulled off.
- CHECK FOR FUEL LEAKS
- INSTALL REAR FLOOR SERVICE HOLE COVER
- INSTALL REAR SEAT CUSHION ASSEMBLY
Fuel system (2AZ−FE)(From July, 2003)
Fuel injector assy (2AZ−FE)(From July, 2003)
Fuel pump assy (2AZ−FE)(From July, 2003)
Fuel tank assy (2AZ−FE)(From July, 2003)
Fuel system (1MZ−FE/3MZ−FE)
Fuel injector assy (1MZ−FE/3MZ−FE)
Fuel system (2AZ−FE)(From July, 2003)
Fuel pump assy (1MZ−FE/3MZ−FE)
Fuel tank assy (1MZ−FE/3MZ−FE)
Fuel system (2AZ−FE)(From July, 2003)
Fuel injector assy (2AZ−FE)(From July, 2003)
Toyota Camry XV30 (2002–2006) Service Manual
- Introduction
- Audio & visual system
- Automatic transmission / trans
- Brake
- Clutch
- Communication system
- Cooling
- Cruise control
- Drive shaft / propeller shaft
- Emission control
- Engine control system
- Engine hood/door
- Engine mechanical
- Exhaust
- Exterior/interior trim
- Front suspension
- Fuel
- Heater & air conditioner
- Ignition
- Instrument panel/meter
- Intake
- Lighting
- Lubrication
- Manual transmission/transaxle
- Parking brake
- Power steering
- Rear suspension
- Seat
- Service specifications
- Sliding roof/convertible
- Starting & charging
- Steering column
- Supplemental restraint system
- Theft deterrent & door lock
- Tire & wheel
- Windshield/windowglass/mirror
- Wiper & washer
- Wiring
Categories
