 Toyota Camry XV30 (2002–2006) Service ManualFuel
Fuel tank assy (1MZ−FE/3MZ−FE)
Fuel tank assy (1MZ−FE/3MZ−FE)
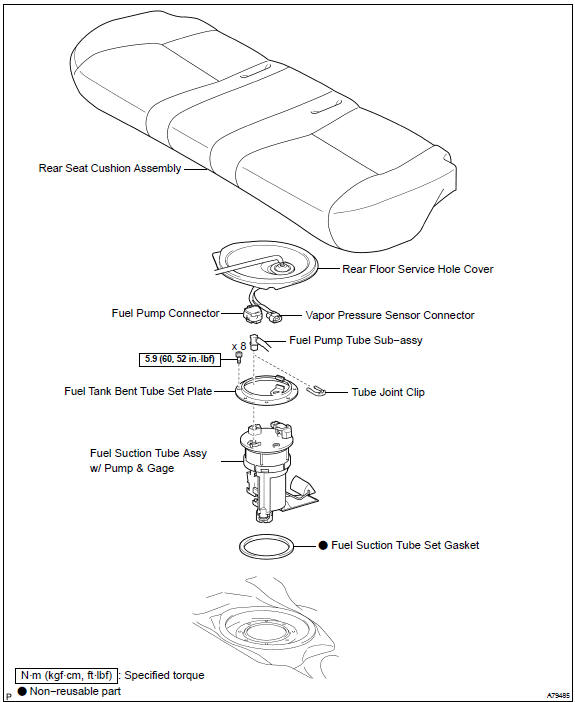
COMPONENTS
REPLACEMEN
- DISCHARGE FUEL SYSTEM PRESSURE
- REMOVE REAR SEAT CUSHION ASSEMBLY
- REMOVE REAR FLOOR SERVICE HOLE COVER
- SEPARATE FUEL PUMP TUBE SUB−ASSY
- REMOVE FUEL TANK VENT TUBE SET PLATE
- REMOVE FUEL SUCTION TUBE ASSY W/ PUMP & GAGE
- DRAIN FUEL
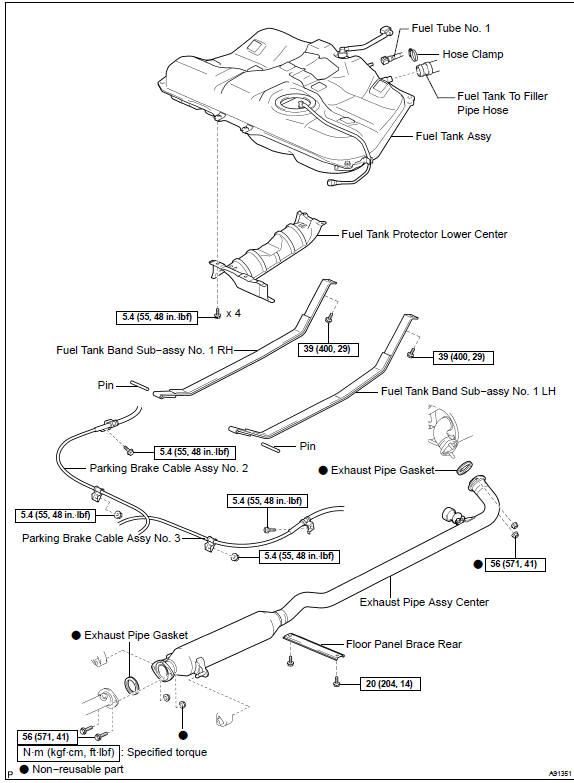
- REMOVE FLOOR PANEL BRACE REAR
- REMOVE EXHAUST PIPE ASSY CENTER
a. Remove the 2 bolts, 4 nuts, exhaust pipe and 2 gaskets.
10. DISCONNECT PARKING BRAKE CABLE ASSY No.2
a) Remove the set bolt and the set nut of the parking brake cable.
 Disconnect parking brake cable assy No.2
11. DISCONNECT PARKING BRAKE CABLE ASSY No.3
a. Remove the set bolt and the set nut of the parking brake cable.
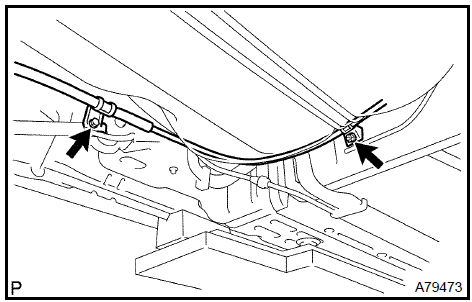 Disconnect parking brake cable assy No.3
12. REMOVE FUEL TANK PROTECTOR LOWER CENTER
a. Remove the 4 bolts and fuel tank protector.
 Remove fuel tank protector lower center
13. REMOVE FUEL TANK ASSY
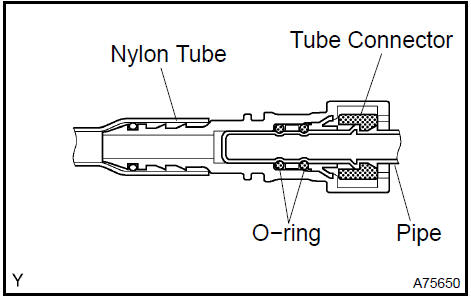
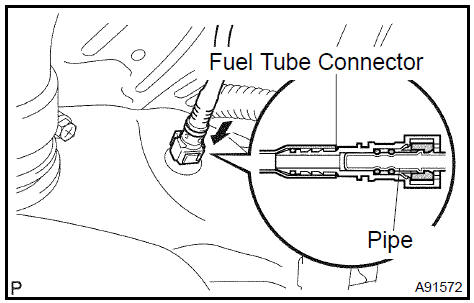
a. Disconnect the fuel pump tube.
- Pinch the tab of the retainer to remove the lock claws and pull down it as shown in the illustration.
- Pull out the fuel tank main tube.
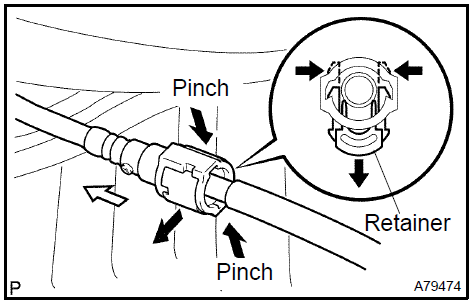
NOTICE:
- Before this operation, check the connector for dirt, mud or other contamination.
- Be careful of mud. The connector’s O−ring, which seals the pipe and connector, becomes contaminated easily.
- Do not use any tools in this operation.
- Do not bend or twist the nylon tube. Protect the connector by covering it with a vinyl or plastic bag.
- When the pipe and connector are stuck, push and pull the connector to release it. Then pull out the connector from the pipe.
b. Disconnect the fuel tube No. 1.
1. Pinch the tube connector and then pull out the fuel tube No. 1.

NOTICE:
- Before this operation, check the connector for dirt, mud or other contamination.
- Be careful of mud. The connector’s O−ring, which seals the pipe and connector, becomes contaminated easily.
- Do not use any tools in this operation.
- Do not bend or twist the nylon tube. Protect the connector by covering it with a vinyl or plastic bag.
- When the pipe and connector are stuck, push and pull the connector to release it. Then pull out the connector from the pipe.
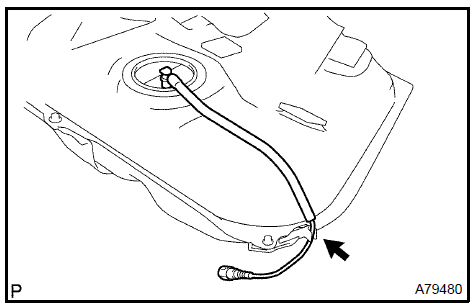
- Set up a transmission jack underneath the fuel tank.
- Remove the 2 set bolts of the fuel tank bands.
- Remove the hose clamp and disconnect the fuel tank to filler pipe hose.
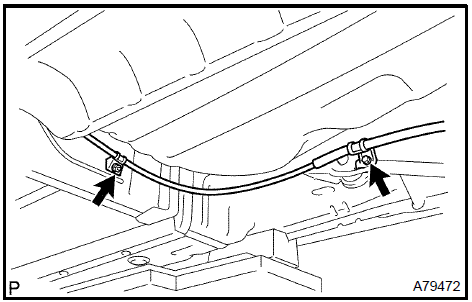
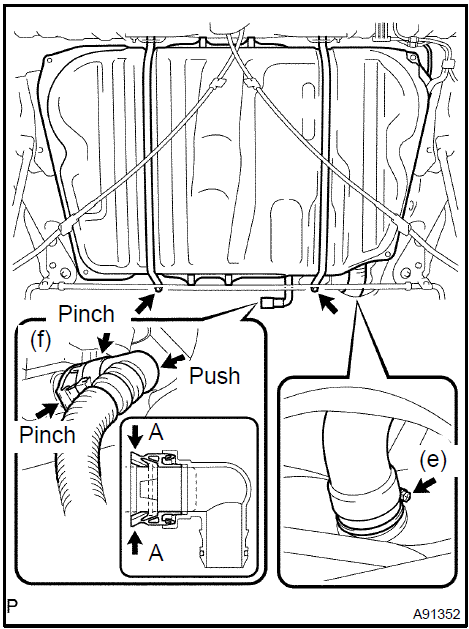
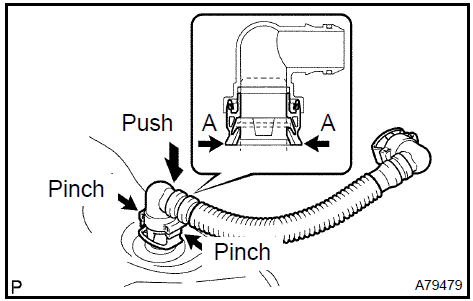
- Disconnect the fuel tank vent hose from the charcoal canister.
- Push the connector deep into the charcoal canister to release the locking pin.
- Pinch portion A.
- Pull out the connector.
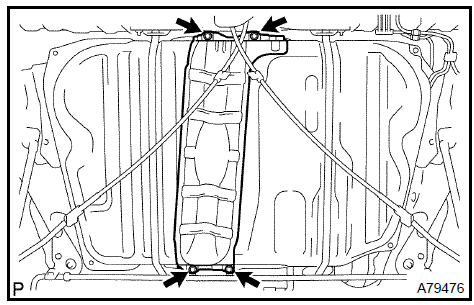
g. Remove the fuel tank.
h. Remove the 2 pins and 2 fuel tank bands as shown in the illustration.
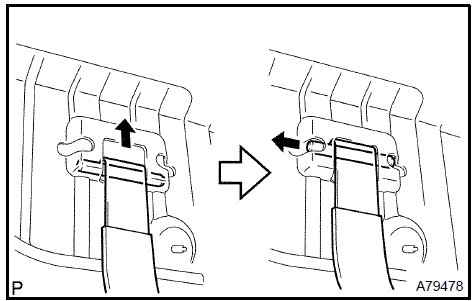
i. Remove the 4 clip nuts.
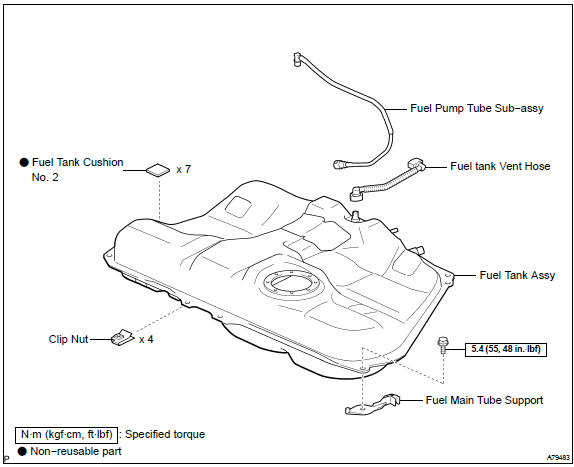
14. REMOVE FUEL TANK VENT HOSE
- Push the connector deep into the charcoal canister to release the locking pin.
- Pinch portion A.
- Pull out the connector.
 Remove fuel tank vent hose
15. REMOVE FUEL PUMP TUBE SUB−ASSY
a. Remove the fuel pump tube from the fuel main tube support.
 Remove fuel pump tube sub-assy
16. REMOVE FUEL MAIN TUBE SUPPORT
a. Remove the bolt and tube support.
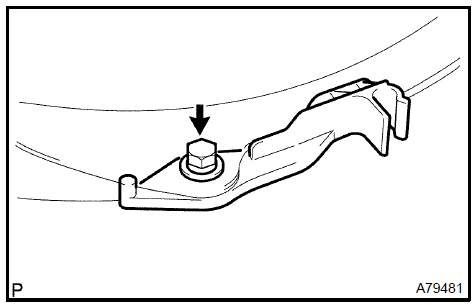 Remove fuel main tube support
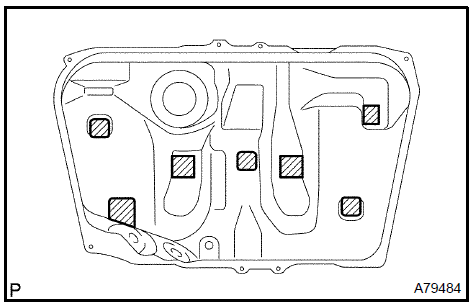
- REMOVE FUEL TANK CUSHION No.2
- INSTALL FUEL TANK CUSHION No.2
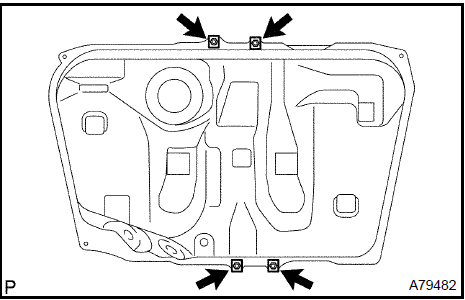
a. Install 7 new fuel tank cushions to the fuel tank.
- INSTALL FUEL MAIN TUBE SUPPORT Torque: 5.4 N·m (55 kgf·cm, 48 in.·lbf)
- INSTALL FUEL PUMP TUBE SUB−ASSY
- INSTALL FUEL TANK VENT HOSE
- INSTALL FUEL TANK ASSY
- Install the 4 clip nuts.
- Install the 2 fuel tank bands with the 2 pins.
- Connect the fuel tank vent hose.
- Connect the fuel tank inlet pipe with the fuel filler pipe clamp.
- Tighten the set 2 bolts of the fuel tank bands.
Torque: 39 N·m (400 kgf·cm, 29 ft·lbf)
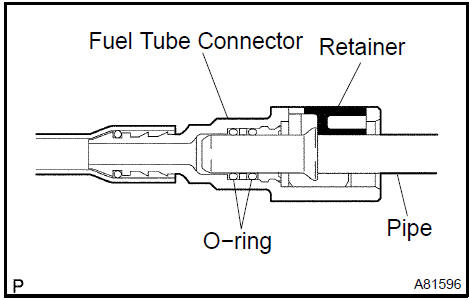
- Connect the fuel tube No. 1.
- Push the fuel tube connector into the pipe until fuel tube connector makes ”click” sound.
NOTICE:
- Check if there is any damage or foreign objects on the connected part.
- After connecting, check if the fuel tube connector and the pipe are securely connected by trying to pull them apart.
g. Connect the fuel pump tube.
1. Push in the fuel tube connector to the pipe until, and push up retainer to the claws lock.
NOTICE:
- Check if there is any damage or foreign objects on the connected part.
- After connecting, check if the fuel tube connector and the pipe are securely connected by trying to pull them apart.

- INSTALL FUEL TANK PROTECTOR LOWER CENTER Torque: 5.4 N·m (55 kgf·cm, 48 in.·lbf)
- INSTALL PARKING BRAKE CABLE ASSY No.3 Torque: 5.4 N·m (55 kgf·cm, 48 in.·lbf)
- INSTALL PARKING BRAKE CABLE ASSY No.2 Torque: 5.4 N·m (55 kgf·cm, 48 in.·lbf)
- INSTALL EXHAUST PIPE ASSY CENTER
a. Install 2 new gaskets and the exhaust pipe with the 2 bolts and 4 new nuts.
Torque: 56 N·m (571 kgf·cm, 41 ft·lbf)
- INSTALL FUEL SUCTION TUBE ASSY W/ PUMP & GAGE
- INSTALL FUEL TANK VENT TUBE SET PLATE
- CONNECT FUEL PUMP TUBE SUB−ASSY
- ADD FUEL
- CHECK FOR FUEL LEAKS
- CHECK FOR EXHAUST GAS LEAKS
- INSTALL REAR FLOOR SERVICE HOLE COVER
- INSTALL REAR SEAT CUSHION ASSEMBLY
- INSTALL FLOOR PANEL BRACE REAR
Fuel system (2AZ−FE)(From July, 2003)
Fuel injector assy (2AZ−FE)(From July, 2003)
Fuel pump assy (2AZ−FE)(From July, 2003)
Fuel tank assy (2AZ−FE)(From July, 2003)
Fuel system (1MZ−FE/3MZ−FE)
Fuel injector assy (1MZ−FE/3MZ−FE)
Fuel system (2AZ−FE)(From July, 2003)
Fuel pump assy (1MZ−FE/3MZ−FE)
Fuel tank assy (1MZ−FE/3MZ−FE)
Fuel system (2AZ−FE)(From July, 2003)
Fuel injector assy (2AZ−FE)(From July, 2003)
Toyota Camry XV30 (2002–2006) Service Manual
- Introduction
- Audio & visual system
- Automatic transmission / trans
- Brake
- Clutch
- Communication system
- Cooling
- Cruise control
- Drive shaft / propeller shaft
- Emission control
- Engine control system
- Engine hood/door
- Engine mechanical
- Exhaust
- Exterior/interior trim
- Front suspension
- Fuel
- Heater & air conditioner
- Ignition
- Instrument panel/meter
- Intake
- Lighting
- Lubrication
- Manual transmission/transaxle
- Parking brake
- Power steering
- Rear suspension
- Seat
- Service specifications
- Sliding roof/convertible
- Starting & charging
- Steering column
- Supplemental restraint system
- Theft deterrent & door lock
- Tire & wheel
- Windshield/windowglass/mirror
- Wiper & washer
- Wiring
Categories
