 Toyota Camry XV30 (2002–2006) Service ManualEngine hood/door
Rear door
Rear door
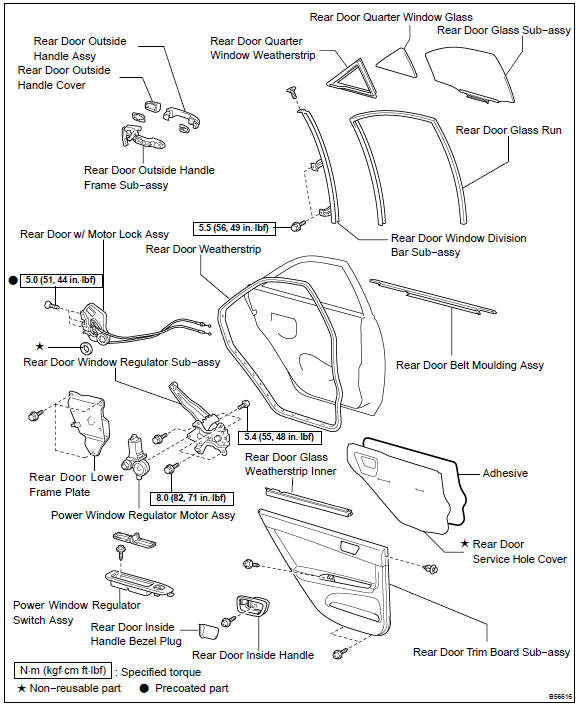
COMPONENTS
ADJUSTMENT
HINT:
-
The installation is in the reverse orderof the removal. However, when there is a special point concerning the installation, it is indicated.
-
On the LH side, use the same procedures as on the RH side.
HINT: Since the centering bolt is used as a door hinge set bolt, the door can not be adjusted with it on. Substitute a bolt with washer for the centering bolt.
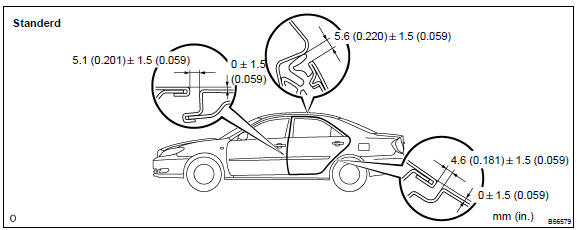
1. INSPECT REAR DOOR PANEL SUB−ASSY LH
a. Check that the clearance is within the standard value.
 Inspect rear door panel sub-assy LH
-
REMOVE FRONT DOOR SCUFF PLATE LH
-
REMOVE REAR DOOR SCUFF PLATE LH
-
REMOVE FRONT DOOR OPENING TRIM WEATHERSTRIP LH
-
REMOVE REAR DOOR OPENING TRIM WEATHERSTRIP LH
-
REMOVE CENTER PILLAR GARNISH LOWER LH
-
ADJUST REAR DOOR PANEL SUB−ASSY LH
-
Adjust the door by loosening the body side hinge nuts and bolts. Forward / rearward and vertically.
-
Tighten the bolts after adjustment.
Torque: 26 N·m (265 kgf·cm, 19 ft·lbf)
-
Adjust the door by loosening the door side hinge bolts.
Horizontally and vertically.
-
Tighten the bolts after adjustment.
Torque: 26 N·m (265 kgf·cm, 19 ft·lbf)
-
Adjust the striker position by slightly loosening the striker mounting screws and hitting the striker with a brass bar and hammer.
-
Tighten the striker mounting screws after adjustment.
Torque: 23 N·m (235 kgf·cm, 17 ft·lbf)
OVERHAUL
HINT:
-
The installation is in the reverse order of the removal. However, when there is a special point concerning the installation, it is indicated.
-
On the LH side, use the same procedures as on the RH side.
1. REMOVE POWER WINDOW REGULATOR SWITCH ASSY REAR
-
Remove the armrest base cover lower.
-
Remove the screw.
-
Using a screwdriver, remove the regulator switch then disconnect the connector.
NT: Tape the screwdriver tip before use.
Remove power window regulator switch assy rear
2. REMOVE REAR DOOR INSIDE HANDLE BEZEL PLUG LH
a. Using a screwdriver, remove the inside handle bezel plug.
HINT: Tape the screwdriver tip before use.
Remove rear door inside handle bezel plug LH
3. REMOVE REAR DOOR TRIM BOARD SUB−ASSY LH
-
Remove the 4 screws.
-
Using a screwdriver, remove the clip.
-
Using a screwdriver, remove the trim board.
HINT: Tape the screwdriver tip before use.
d. Remove the inside handle then disconnect the 2 cables from the rear door lock assembly.
Remove rear door trim board sub-assy LH
4. REMOVE REAR DOOR LOWER FRAME PLATE SUB−ASSY LH
a. Remove the 3 screws and lower frame plate.
5. REMOVE REAR DOOR SERVICE HOLE COVER LH
a. Disconnect each connector and remove the service hole cover.
NOTICE: Remove the remaining tape on the body side.
-
REMOVE REAR DOOR GLASS WEATHERSTRIP INNER LH
-
REMOVE REAR DOOR GLASS RUN LH
-
REMOVE REAR DOOR WEATHERSTRIP LH
a. Using a screwdriver, remove the door weatherstrip.
HINT: Tape the screwdriver tip before use.
-
REMOVE REAR DOOR BELT MOULDING ASSY LH
-
REMOVE REAR DOOR WINDOW FRAME SUB−ASSY REAR LOWER LH
-
Remove the screws.
-
Remove the 2 bolts and window frame rear lower.
11. REMOVE REAR DOOR QUARTER WINDOW GLASS LH
a. Remove the quarter window glass.
12. REMOVE REAR DOOR GLASS SUB−ASSY LH
HINT: Insert a shop rag inside the door panel to prevent scratching the glass.
-
Open the door glass.
-
Tilt the door glass and disconnect the roller of the regulator from the channel to remove the door glass.
NOTICE: Do not damage the door glass.
HINT: Pull the glass upward to remove it.
13. REMOVE REAR DOOR WINDOW REGULATOR SUB−ASSY LH
-
Disconnect the connector.
-
Loosen the temporarily installed bolt.
NOTICE: When the temporarily installed bolt is removed, the rear door window regulator might drop and be deformed.
c. Remove the 3 bolts and window regulator.
14. REMOVE POWER WINDOW REGULATOR MOTOR ASSY LH
a. Using a torx) wrench (T25), remove the 3 screws and the motor.
15. REMOVE REAR DOOR W/MOTOR LOCK ASSY LH
-
Disconnect the connector.
-
Using a torx) wrench (T30), remove the 3 screws and the door lock.
16. REMOVE REAR DOOR OUTSIDE HANDLE COVER RH
a. Using a torx) wrench (T30), loosen the screw and remove the outside handle cover.
17. REMOVE REAR DOOR OUTSIDE HANDLE ASSY LH
a. Pull and hold the release plate of the outside handle frame, as shown in the illustration.
b. Pushing the outside handle in the arrow mark direction in the illustration, remove the outside handle.
NOTICE: If the release plate is not pulled and held when removing the outside handle assembly, then the release pate will interfere with the outside handle and it will damage the release plate.
18. REMOVE REAR DOOR OUTSIDE HANDLE FRAME SUB−ASSY LH
a. Using a torx) wrench (T30), loosen the screw and remove the outside handle frame.
19. INSTALL REAR DOOR OUTSIDE HANDLE FRAME SUB−ASSY LH
a. Using a torx) wrench (T30), install the outside handle frame with the screw.
Torque: 4.0 N·m (41 kgf·cm, 37 in.·lbf)
20. INSTALL REAR DOOR OUTSIDE HANDLE COVER RH
a. Using a torx) wrench (T30), install the outside handle cover with the screw.
Torque: 4.0 N·m (41 kgf·cm, 37 in.·lbf)
21. INSTALL REAR DOOR W/MOTOR LOCK ASSY LH
a. Install a new door lock wire harness packing.
NOTICE:
-
If reusing the removed lock with rear door lock, the packing in the connecting part should be replaced with a new one.
-
Be careful that grease and dirt will not stick to the packing surface in the connecting part.
-
Reusing the removed packing or using a damaged packing will cause water to penetrate through the connecting part, and it will result in a malfunction of the door lock.
b. Engage the door lock with rear door motor with the release plate of the outside handle, and then set it to the door panel.
NOTICE: Make sure that the release plate of the outside handle frame is securely engaged with the lock assembly.
c. Apply adhesive to the threads of the 3 screws.
Adhesive:
Part No. 08833−00070, THREE BOND 1324 or equivalent
d. Using a torx) wrench (T30), install the door lock with the 3 screws and bolt.
Torque: 5.0 N·m (51kgf·cm, 44 in.·lbf)
22. INSTALL POWER WINDOW REGULATOR MOTOR ASSY LH
a. Using a torx) wrench (T25), install the power window regulator motor with the 3 screws.
23. INSTALL REAR DOOR WINDOW REGULATOR SUB−ASSY LH
-
Install the temporarily installed bolt securely.
-
Install the temporarily installed bolt to the window regulator to the rear door panel, and install the window regulator temporarily.
-
Tighten the 3 bolts and the temporarily installed bolt.
Torque: 8.0 N·m (82 kgf·cm, 71 in.·lbf)
-
Connect the connector.
24. INSTALL REAR DOOR SERVICE HOLE COVER LH
a. Install a new service hole cover to the door panel.
HINT:
-
When installing the service hole cover, pull out the links and connectors through the service hole cover.
-
There should be no wrinkles or folds on the service hole cover after attaching it.
-
After attaching the service hole cover, sealing condition should be confirmed.
Install rear door service hole cover LH
Hood
Rear door
Luggage compartment door
Luggage door hinge torsion bar
Hood support rod
Front door
Toyota Camry XV30 (2002–2006) Service Manual
- Introduction
- Audio & visual system
- Automatic transmission / trans
- Brake
- Clutch
- Communication system
- Cooling
- Cruise control
- Drive shaft / propeller shaft
- Emission control
- Engine control system
- Engine hood/door
- Engine mechanical
- Exhaust
- Exterior/interior trim
- Front suspension
- Fuel
- Heater & air conditioner
- Ignition
- Instrument panel/meter
- Intake
- Lighting
- Lubrication
- Manual transmission/transaxle
- Parking brake
- Power steering
- Rear suspension
- Seat
- Service specifications
- Sliding roof/convertible
- Starting & charging
- Steering column
- Supplemental restraint system
- Theft deterrent & door lock
- Tire & wheel
- Windshield/windowglass/mirror
- Wiper & washer
- Wiring
Categories
